

Surviving my first (recorded) live coding session Series - Part 1
Setting up everything to record myself coding and talking
By Arnaud Lauret, August 4, 2021
I did my first ever (recorded) live coding session at the Manning API conference. During 30 minutes I talked and coded … without any slides; that was totally new to me. While it started well, preparing and recording this session turned out to be quite complicated. At some moment, I was totally desperate and I thought I wasn’t going to make it. But I did it and learned a lot of stuff that deserves to be shared. In this first post, I’ll talk about how “it started well”: setting up OBS, mic, cam and VS Code to record myself speaking and coding.
Surviving my first (recorded) live coding session Series
I did my first ever (recorded) live coding session at the Manning API conference: Supercharge OpenAPI to efficiently describe APIs (click to what it!). It was about the OpenAPI Specification, how to use it efficiently when designing and documenting API. The idea was to write an OpenAPI Specification document and show the spec basic to advanced features, tips and tricks and use a few tools around all that. This post series aim to share all what I’ve learned preparing this session.
Spoiler alert!
You can get all VS Code stuff explained in this series in my supercharged-openapi github repository. It is the one that I actually used during the session.
- 1 - Setting up everything to record myself coding and talking
- 2 - Preparing session content and realizing it's not working well
- 3 - Slide deck like live coding with titles and speaker's notes using OBS and VS Code
- 4 - Live coding at light speed with VS Code
- 5 - Improving live coding session tuning and rehearsing with VS Code
Discovering OBS Studio
Manning recommended using OBS Studio to record the session. It is a free and open source software for video recording and live streaming. It comes out of the box with many features that will be enough to start but it can be easily extended with plugins for power users. Besides being used to stream or record a video, OBS can also be used as a virtual camera in tools such as Zoom ou Teams for instance. Note that a company called Streamlabs does a fork of OBS, called Streamlabs OBS, adding some features but apparently also adding some CPU usage (I did not verify it myself though).
I already tinkered with OBS briefly a few month ago but did not do much with it. With this session to record, I could put my hands on it more seriously and I was quite impressed.
Scenes and sources
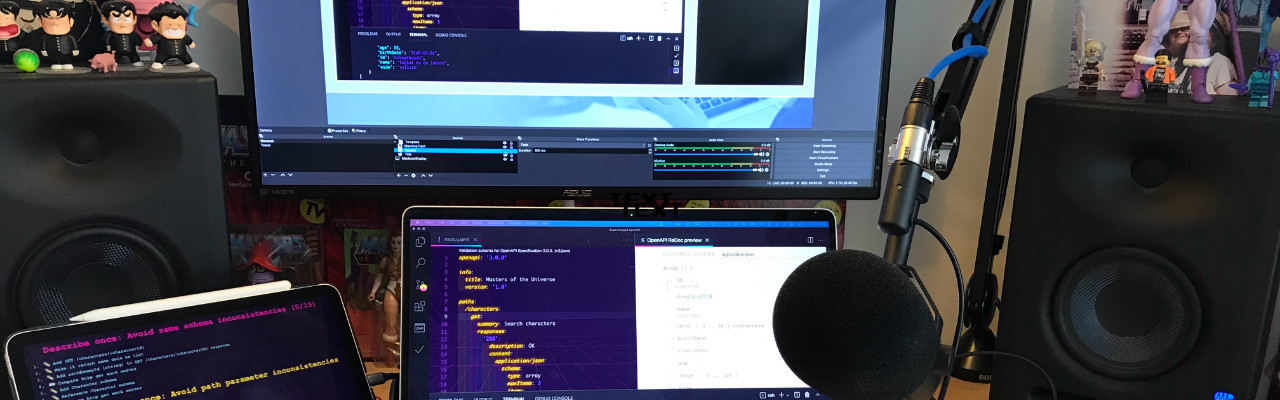
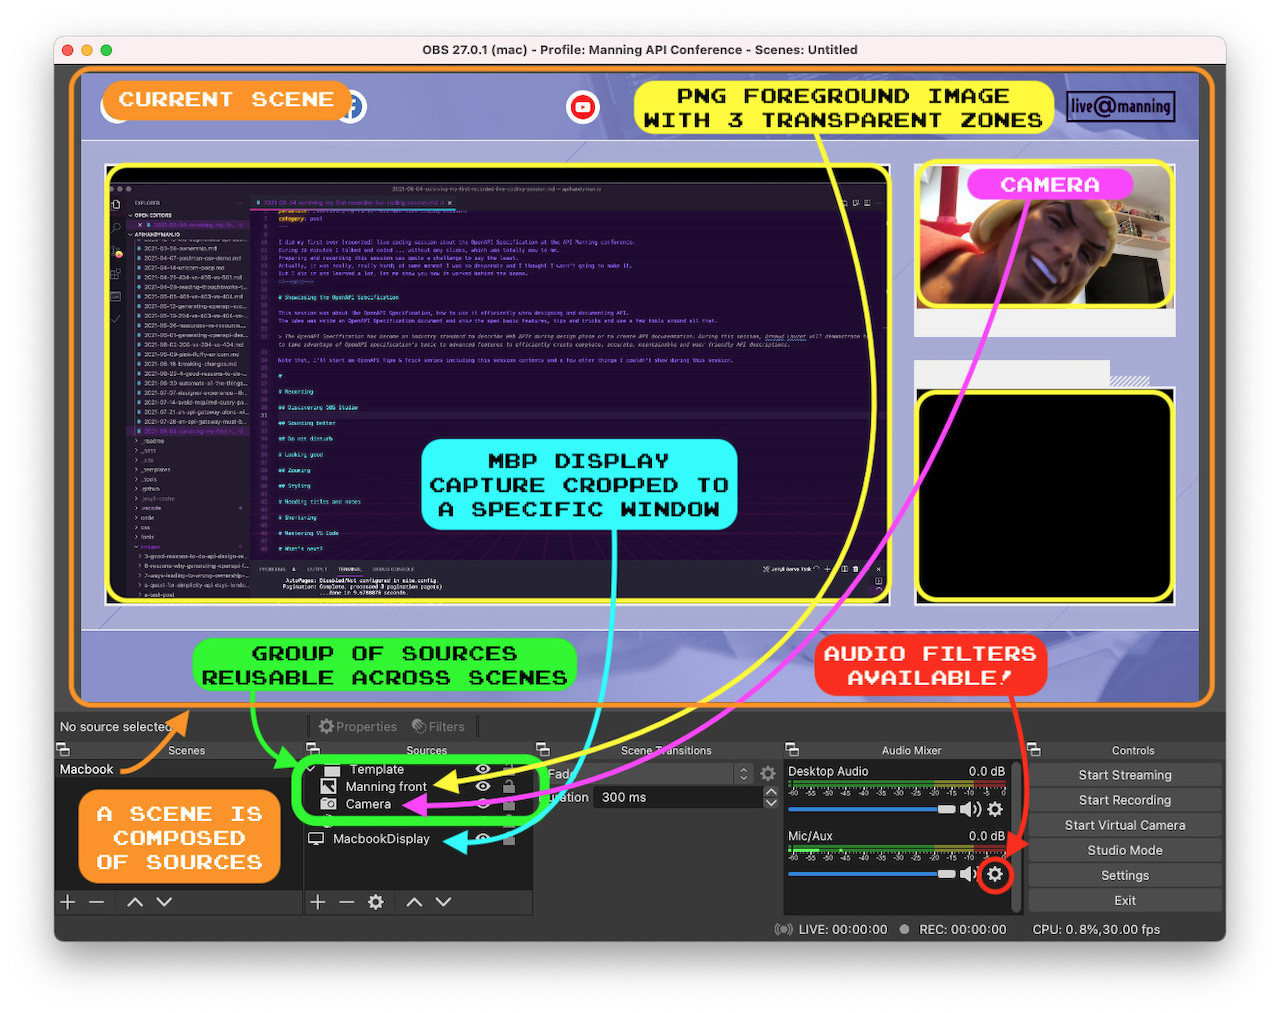
You can create various scenes, each one showing different sources such as your webcam (or any other camera plugged to your computer), static text or images, browser window and display capture. You can place and size each item as you wish. In a matter of seconds I was able to create a few scenes mixing display capture cropped on specific windows, image, text and my webcam.
For this session, Manning provided me a PNG image with 3 black (transparent) zones, my cam going on the top right zone and what I want to show on the big left one as you can see in the capture above. The image, “Manning front” in sources, is above the “Camera” (MBP webcam) and “MacBookDisplay” sources, that way nothing overflows outside of the reserved spaces.
Automatic Advanced scene switching
Though I didn’t keep that in the final version of my session, I tested using multiple scenes. When handling multiple scenes, you can switch from one to another using keyboard shortcuts, but you can also use automatic switching (in menu bar choose Tools → Automatic Scene Switcher). It allows to switch to a scene based on active window title. It’s really impressive, you feel like a TV show director AND a magician doing so!
While testing the standard Automatic Scene Switcher, I was a little bit annoyed by some limitations especially one regarding its activation. Indeed, you have to not forget to start it before starting a recording. Hopefully, everything was solved once I found the Advanced Scene Switcher plugin. This one propose more powerful features but also a simple one: “start advanced scene switch when recording/streaming starts”.
Reusable group of sources
Also because I tested using multiple scenes reusing the same sources (foreground image and webcam), I created a folder containing both of them. That way I could reuse them across various scene being sure they were always placed and sized in the same way.
Audio mixer
Last but not least, the audio mixer allows to capture audio from different sources and set volume for each one (like any mixer). Icing on the cake, OBS allow to add some audio filters on any audio source, just hit the ⚙️ icon on the audio source to open the filters configuration. And for those who regularly use some DAWs, know you can even use VST plugins.
Sounding better
Speaking of audio, I did a few recording test While tinkering with OBS and realized that my sound was just terrible.
Trying OBS noise suppression
I’m using a 16” MacBook Pro (MBP) and when using a second screen and some CPU consuming apps its fans start to make some noise. This background noise was clearly audible on the recording. I gave a try to the OBS noise suppression audio filter, it actually suppressed the fan noise but I had some strange sound variation and distortion when it was activated. To make it short: my audio sucked.
Choosing a new mic
As I wanted to buy a decent mic for a long time for future audio/video projects, it didn’t took me long to decide to buy one. Manning recommended the very reasonably priced Audio Technica AT2005USB and I also asked my Twitter friends and had the following recommendations:
- Blue Yeti: A reference for Podcasters
- Tula Mic: A mic and autonomous audio recorder with an incredible look (though my wife took it for a cheese rasp)
- Shure MV7: Recommended by someone who was not happy with the Yeti picking too much background noise
- Shure SM7B: A studio legend which is also used by many podcasters
After making some research, I was hesitating between both Shure, and the winner was … the Shure SM7B. This review helped me make my mind, it’s full of very interesting information. I choose the pricier SM7B because of its quality and because I already had all that was need to use it. Indeed this mic requires a 60db amplifier and my Line 6 Helix Floor guitar effect and amp simulator has a mic input that can handle that. For a lower budget, the MV7 seems very good (and is more plug and play).
To hold it, I bought the Rode PSA1 boom arm based on a good friend recommendation and hundreds of good reviews. Be careful when manipulating this boom, its spring are strong and the arm can cause some damage when you remove the mic from it without holding the arm firmly. I almost destroyed my guitar which is hanging on the wall doing so 😱, hopefully the arm hit the wall a few centimeters away. Also, if you consider buying this boom, double check if your mic weights enough, if it’s not the case, it will be complicated to adjust its position (because of the strong springs). There’s no such problem with the Shure SM7B which weights enough.
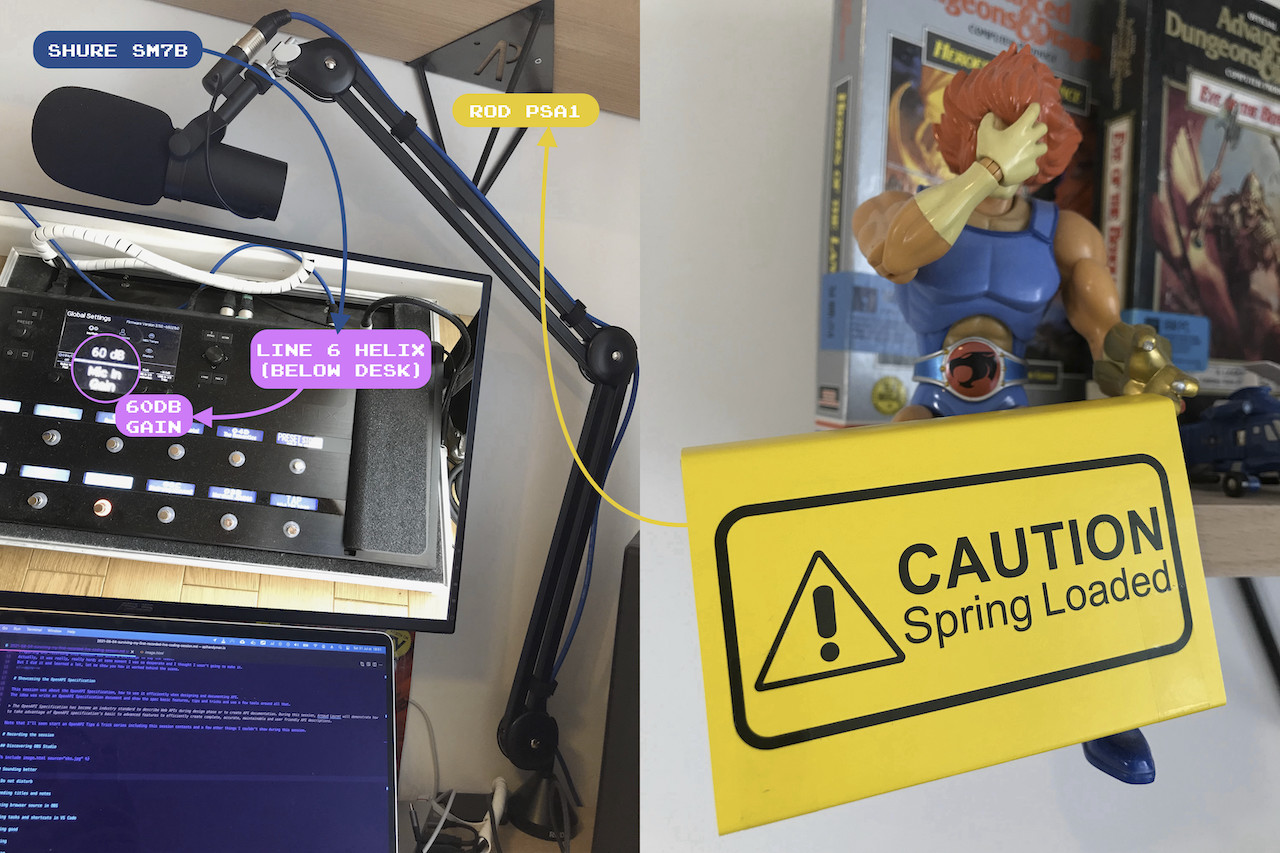
Once I recovered from my emotions and finished fixing, plugin and configuring the mic (the 60db gain), I realized that I could use all of the Helix effects, such as input gate (to filter background noises below a given level), compressor (dyn, to keep audio level in a given db range by boosting or reducing volume) or preamp (pre, to add/remove bass or medium for instance). In order to avoid hurting my back by bending in two under the desk, I use the HX Edit application (shown below) to configure the Helix. My audio can still probably be improved as I didn’t took much time to tweak it but it definitely rocked (compared to MBP mic) even without any effect activated but the input gate.

Looking good enough
That’s not a secret, the MBP webcam is not the best one to say the least. It’s probably the same hardware on all MacBooks since more than 10 years
IPhone as webcam … or not
I did a few tests using my iPhone as a webcam using the EpocCam application. It was not working well over wifi, there we some random disconnections. But when plugged on my MBP with a lightning to USB cable it worked perfectly. The image was far better than with the webcam BUT positioning the iPhone on my desk was complicated. I put it on top of a stack of books behind my MBP but I was not satisfied.
I thought buying a stand for it but realized that as the zone for the camera on the Manning template was small, the difference between the “not so good but well placed webcam” and “the better but complicated to position iPhone” was not so noticeable so I used the webcam (I also gave up because I was in rush to do the recording, but that’s a story for next post).
(Virtual) Green screen … or not
I finally did not used it but EpocCam provides a virtual green screen that do the trick. You can take advantage of it in OBS using the chroma key effect filter on your video source.
To do what you see above:
- Activate virtual green screen on your camera (or put a real one behind you)
- Open the (Effect) filters configuration screen by selecting your camera source and clicking on “Filters” above the source panel (or right-click on camera source and select filters)
- Click on + in “Effect Filters” and select “Chroma Key”
Coding with style
I always try to do beautiful and readable slides for my sessions … but this time I was going to use VS Code.
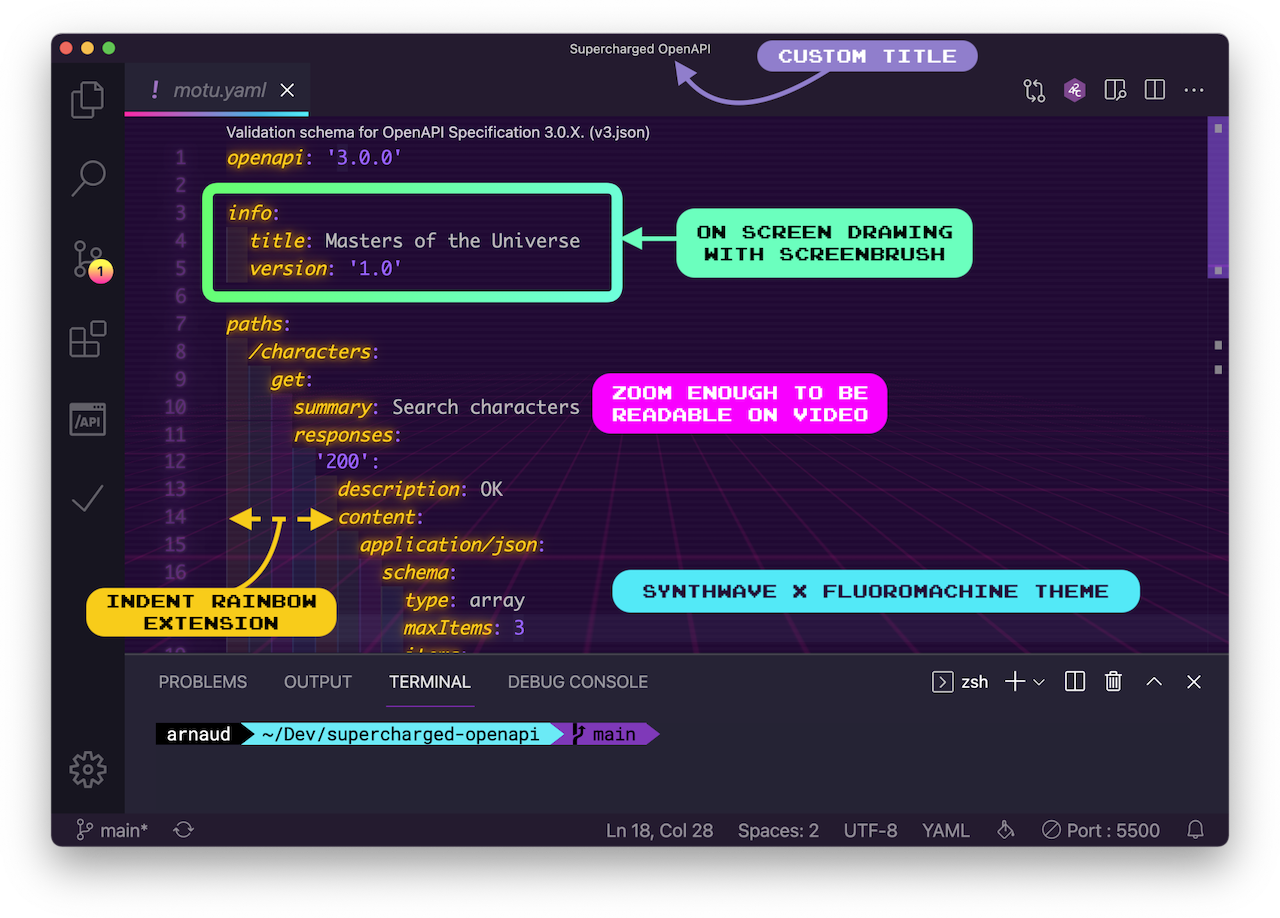
Zooming enough
What worried me the most at that stage was the font size. Indeed if you capture your 36K hyper-ultra-mage-wide screen with regular font size, nobody will be able to read what you type on a 1920x1080 video which may not be viewed in full screen. In my case, I also had to be careful because the actual place reserved for my screen capture was smaller than the video size, only 1340x750.
In VS Code (like in many Electron apps), you can use ⌘+ (Mac) or ctrl+ (Windows) to zoom in (make things bigger) and ⌘- (Mac) or ctrl- (Windows) to zoom out (make things smaller).
In order to set an adapted zoom level, I made some test recording and compared them with someone writing code at a previous Manning conference available on YouTube. I tried to keep thing readable even the video is not in full screen (regular YouTube embedded video size).
I also tinkered with the Accessibility zoom feature of MacOS, you can make appear or zooming lens zone (the size you want) using a keyboard shortcut. I finally didn’t needed it but I keep that in mind for another time.
Styling VS Code
I wanted something that look different from my good old VS Code standard theme and discovered many 80s theme in the marketplace. I finally choose Synthwave x Fluoromachine which comes with a nice background image for the editor. To make it fully work you’ll need Custom CSS and JS Loader.
As I have done many tests, I don’t remember if that theme was the actual cause but as I had some standard VS code CSS customized, “Unsupported” appeared in the window’s title. To get rid of it, I used Fix VSCodeCheckums, it fixes VS code files checksum and make the “Unsupported” disappear.
And I also use the Indent Rainbow extension that obviously colors indentations. Besides being pretty that’s very useful.
Drawing on screen
And last but not least, the mouse cursor is not always that visible when you want to show something. So I looked for a tool allowing to draw on screen. I found ScreenBrush which is totally amazing and was a perfect match with the Synthwave x Fluoromachine theme. I didn’t used it extensively during the session, I only drew a few rectangles, but it has some many cool features that I will probably use in th future. If you’re on MacOs and looking for a tool to draw on screen, this is the one.
Setting VS Code window title (useful for OBS)
You can’t see it in the recording but I have customized the VS Code window title to make it static and show the session’s title.
This is done by adding a .vscode/settings.json file in your workspace containing the following configuration:
.vscode/settings.json
{
    "window.title": "Supercharged OpenAPI",
}
Check VS code documentation to see all what you can do with window.title.
At the beginning I did that to have my session’s title there but that was actually useful for OBS configuration. Indeed, you can crop screen capture to a window by using its name. But if the window’s name changes … problem starts. So making it static solves the problem.
To be continued
Besides the mic and cam “problems”, which were not a real problems, it was starting well. I was ready to record myself coding and talking. So I started to actually work on the content for the recording and realized it was more than just coding and talking. But it’s a story that will be told in next post.