

Surviving my first (recorded) live coding session Series - Part 3
Slide deck like live coding with titles and speaker's notes using OBS and VS Code
By Arnaud Lauret, August 18, 2021
Third post about my first ever (recorded) live coding session given at the Manning API conference. In previous post, I encountered various problems. Two of them were related to not delivering the session like one of my regular slide deck presentation. I wanted to add titles and have speaker’s notes. In this post, I’ll show you how I solved those two problems with OBS, VS Code and a little bit of magic.
Surviving my first (recorded) live coding session Series
I did my first ever (recorded) live coding session at the Manning API conference: Supercharge OpenAPI to efficiently describe APIs (click to what it!). It was about the OpenAPI Specification, how to use it efficiently when designing and documenting API. The idea was to write an OpenAPI Specification document and show the spec basic to advanced features, tips and tricks and use a few tools around all that. This post series aim to share all what I’ve learned preparing this session.
Spoiler alert!
You can get all VS Code stuff explained in this series in my supercharged-openapi github repository. It is the one that I actually used during the session.
- 1 - Setting up everything to record myself coding and talking
- 2 - Preparing session content and realizing it's not working well
- 3 - Slide deck like live coding with titles and speaker's notes using OBS and VS Code
- 4 - Live coding at light speed with VS Code
- 5 - Improving live coding session tuning and rehearsing with VS Code
Adding titles to avoid loosing attendees
OK, that was not the most important problem, but I care a lot about how my presentations look like: how they can be beautiful but also readable. So though this was a no slides session, I wanted to provide some indications about what was happening. I needed to show some title, like “Describe once (EXPERT): Read/Write with same schema”, as I have on my regular slide. But this time, I was not showing pre-made slides using Google Slides but coding in VS Code. How to add good looking titles in that context? By taking advantage of both OBS and VS Code features.
Showing titles above VS Code
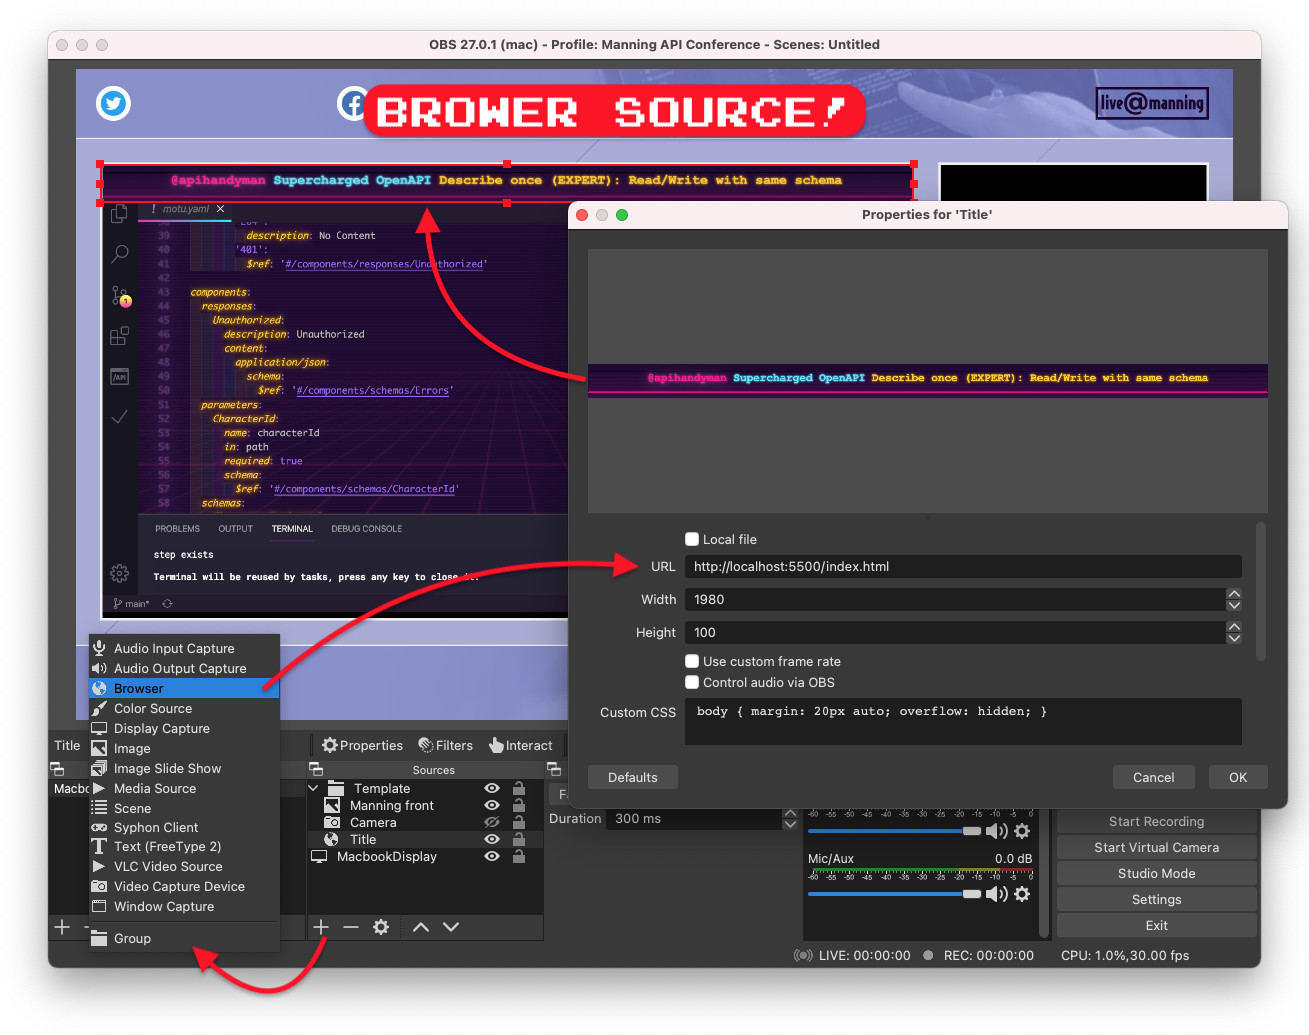
In OBS, you can add various sources in a scene, I already had 3 in my MacBook scene:
- An Image source: the foreground Manning provided to me
- A Video Capture Device source: my webcam (or my IPhone)
- A Display Capture source: my MacBook display cropped on VS Code window titled “Supercharged OpenAPI” (By the way, regarding capturing VS Code, during my tests I also tried the Window Capture source and was not really satisfied with it. There was a huge lag, especially when I was scrolling.)
But there are other types of sources, as you can see in the screen capture above, the one that caught my eye when trying to find a solution for my idea was the Browser source.
I created a simple index.html file containing a “WTF it works!” level 1 header in the body (yes, I tend to curse in my code when testing) then started a simple web server in the folder containing that file.
In OBS, I added a Browser source to my MacBook scene.
In the configuration window, I set up the URL to target http://localhost:8080/index.html, and set width to 1980 (pixels) and height to 100.
There’s some custom CSS that comes by default, I didn’t modify it and hit OK.
Once added, I moved the new source in the scene on top of the zone for my screen and resized it to fit in the reserved space.
Finally in the “Sources” panel, I renamed the new source to “Title” (by right clicking on it and choosing rename).
And I reordered the sources to put “Title” in the “Template” folder, putting above the Display Capture Source (the new source hiding the VS Code window title) but below the Image source.
So I had my title, but it was a static one.
Updating titles POC
I thought I could find a configuration to trigger a refresh at regular interval in OBS, but there’s actually no such configuration. Hopefully, I remembered that while I was reading some post about useful VS Code extensions, the Live Server extension caught my eye. This extension allows to start a web server in your workspace and it includes a live refresh out of the box. That means a webpage loaded through this web server will be updated automatically in the browser when something change in the workspace. So once the extension installed and started, I modified the Browser source configuration in OBS to target this web server, and I was still able to see the “WTF it works!” title. Then I modified the HTML file by replacing the title with “WTF it has been updated!”, hit save … And the title has been updated in OBS seamlessly!
Now that my proof of concept (POC) worked, I needed to show the real titles and switch to the next one when needed but without the attendees noticing anything.
Updating titles magically during the session
What I did is quite ugly, it’s a very first solution that would deserve to be improved (it will be improved!). But it works. The solution is based on static files, an ugly shell script, VS Code custom tasks and custom key bindings.
First, write some ugly shell
In a steps folder, I created sub-folders named step-1 to step-19 (because there were 19 steps in my TOC … at that time) and then put an index.html file in each one.
Obviously, each file contained the title to be shown at each step (title coming from my TOC).
Then I wrote the ugliest possible bash script named next.sh (in steps).
In its most basic version, this script did the following:
- Checking if a
current.txtfile exists, if not creating it and putting0in it - Reading the
current.txtfile, adding1to its value and updating it - Copying the content of
step-{new value}to workspace root
Afterward, I added some controls to do nothing and output some warning when the next step actually doesn’t exist in the steps folder.
The ugly next.sh script
# That's a trick I use in all my shell script
# To get the script actual folder
SCRIPT_DIR="$( cd "$( dirname "${BASH_SOURCE[0]}" )" >/dev/null 2>&1 && pwd )"

# Setting root dir and current.txt variables
ROOT_DIR=$SCRIPT_DIR/..
CURRENT_FILE=$SCRIPT_DIR/current.txt

# If current.txt doesn't exist, creating it
if [[ -f $CURRENT_FILE ]]
then
    echo "not first step"
else
    echo "first step"
    echo "0" > $CURRENT_FILE
fi

# Adding 1 to current.txt value
CURRENT_STEP=`cat $CURRENT_FILE`
CURRENT_STEP=$((CURRENT_STEP+1))
CURRENT_DIR="$SCRIPT_DIR/step-$CURRENT_STEP"
echo $CURRENT_STEP > $CURRENT_FILE
echo "step $CURRENT_STEP, DIR $CURRENT_DIR"

# Checking the next step actually exists
if [[ -d "$CURRENT_DIR" ]]
then
    # Copying everything in step-X folder to root folder
    echo "step exists"
    cp "$CURRENT_DIR"/* "$ROOT_DIR"
else
    echo "no more steps"
fi
So, running the steps/next.sh script (don’t forget to chmod u+x it, like I always do) I could change title from step X to step X+1.
But how to run this script while doing the session?
I couldn’t open a terminal and run it when needed, that wouldn’t be very convenient.
Second, automate with VS Code task
Hopefully, I already partially knew how to solve that because in order to optimize my Jekyll workspace for the apihandyman.io blog I use VS Code Custom tasks to run bach scripts.
So I created a .vscode folder (its the standard folder holding VS Code stuff) and added the following tasks.json file.
This file define the custom tasks that will be available when this workspace/folder is opened in VS Code.
.vscode/tasks.json
{
  "version": "2.0.0",
  "tasks": [
    {
      "label": "Next step",
      "type": "shell",
      "command": "steps/next.sh",
      "presentation": {
        "reveal": "never",
        "panel": "shared"
      },
      "problemMatcher": []
    }
  ]
}
Now instead of opening a terminal and typing a command line to run the script, I could open VS Code command palette (⌘⇧P on MacOs or ctrl⇧P on Windows) and choose Tasks: Run task, then choose the “Next step” one.
That actually runs the shell command steps/next.sh and that is done silently thanks to the presentation.reveal: never.
In the beginning, I actually set presentation.reveal: always to be sure that something was actually happening.
That’s better but still cumbersome, I didn’t want people watching me do that even if that’s really quick.
Third, add a little bit of shortcut magic
VS Code allows to customize keyboard shortcuts and even define ones to trigger tasks (check documentation here). Note that unlike tasks that can be configured locally inside a workspace/folder, key bindings are only defined globally.
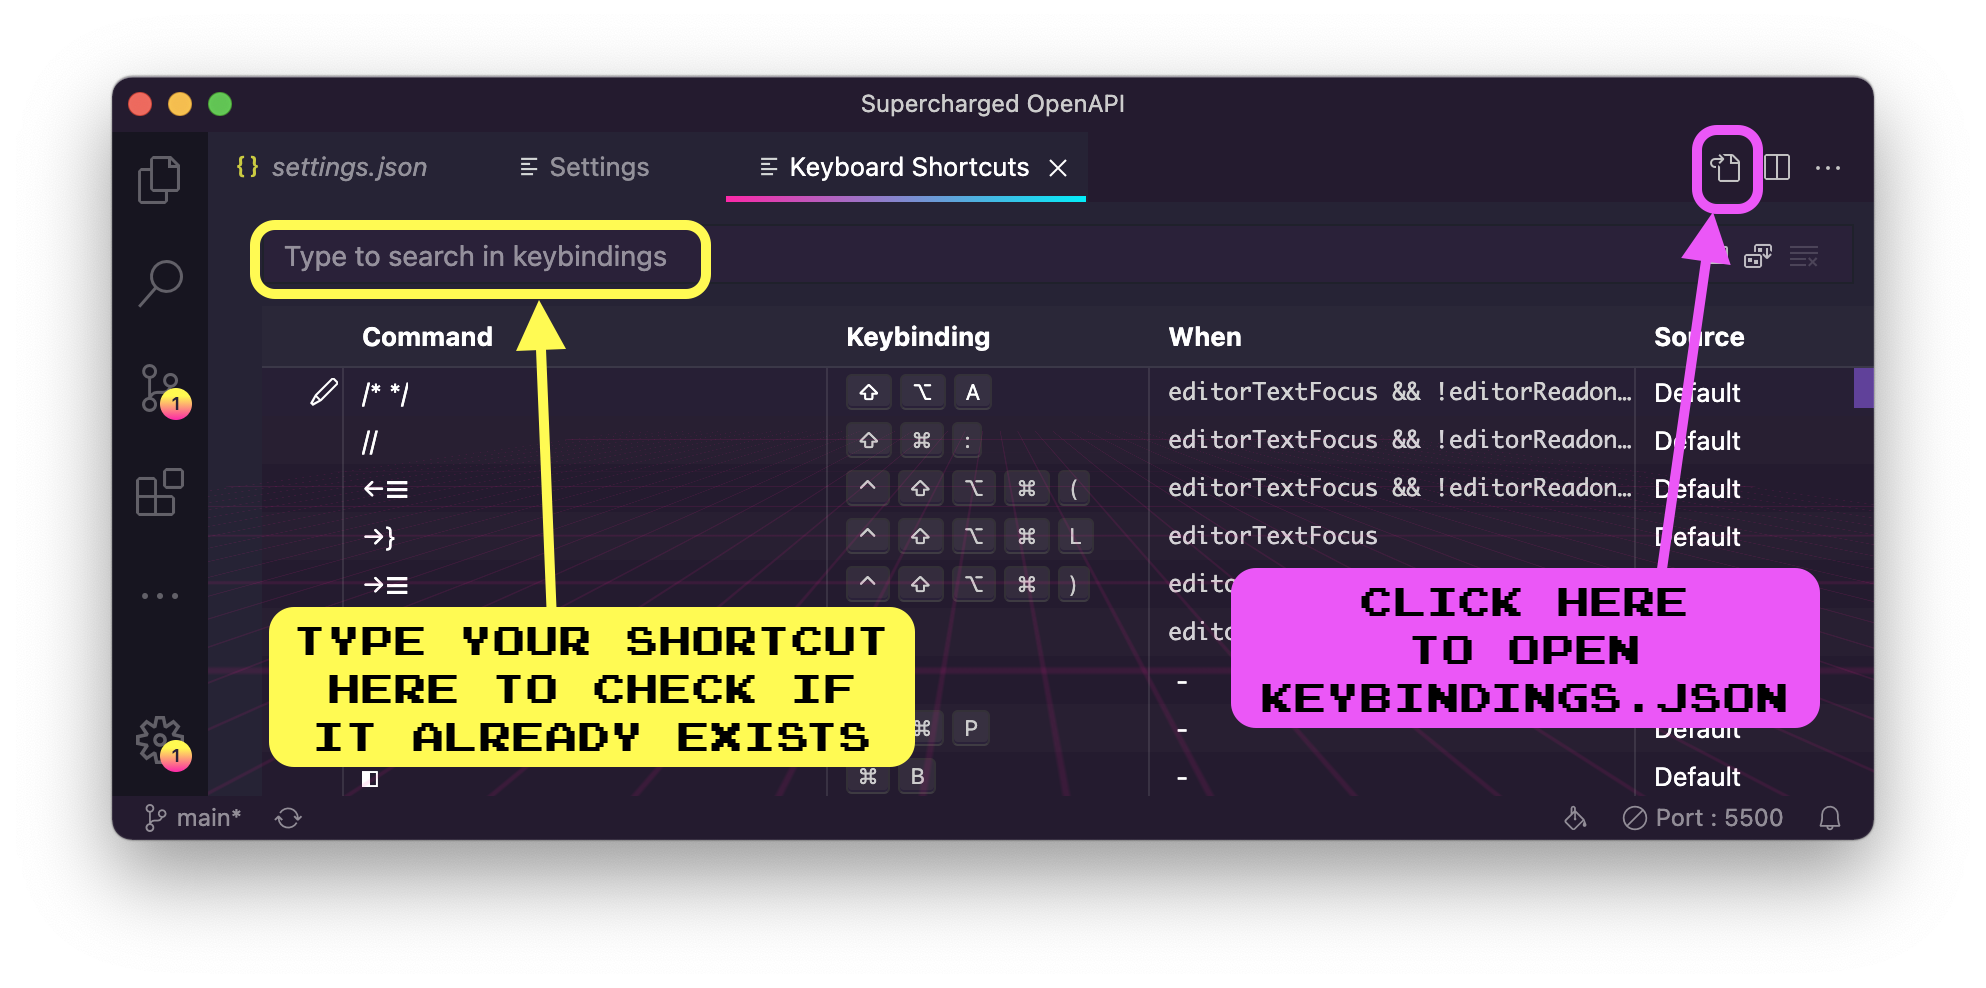
To show shortcuts configuration use ⌘K⌘S on MacOs or ctrlKctrlS on Windows.
Then click on the file icon on top right corner to see the json content of your custom configuration (keybindings.json file).
In order to trigger my “Next step” task when typing ctrlm, I modified my configuration as follow:
keybindings.json
// Place your key bindings in this file to override the defaults
[
    {
        "key": "ctrl+m",
        "command": "workbench.action.tasks.runTask",
        "args": "Next step"
    }
]
Note that before choosing ctrlm, I actually tested a few other shortcuts before finding one that was not already used. To check if a key binding already exists, type it in the text field above the lists as shown in the screenshot above.
That way, I could be like “blah blah blah, and now next topic” … while magically changing the title with ctrlm.
Styling titles
I could change my title but it was simple black text on white background, I wanted something with more style and if possible matching VS Code Style.
Hopefully, while configuring VS Code to use the Synthwave x Fluoromachine theme, I discovered that VS Code theming relies on good old CSS and that this theme CSS was located in $HOME/.vscode/extensions/webrender.synthwave-x-fluoromachine-0.0.12/synthwave-x-fluoromachine.css.
I copy/pasted the file’s content into a index.css file in my workspace and added it to my index.html files then used some css classes defined for this theme: monaco-editor on body then mtk6, mtk7 and mtk8 on the various elements in my title, et voilà!
I now had shiny neon styled titles.
Styling index.html
<html>
    <head>
        <link rel="stylesheet" href="index.css">
    </head>
    <body class="monaco-editor">
        <h1>
            <span class="mtk7">@apihandyman</span>
            <span class="mtk6"> Supercharged OpenAPI</span>
            <span id="section" class="mtk8">A basic OpenAPI File</span>
        </h1>
    </body>
</html>
I was quite satisfied until I realized that the blue text (mtk6) had not the neon effect (attention to details is both my super power and my curse).
I’m definitely not a CSS expert, but I’m damn good at copy/pasting.
So, I compared its definition with the two other mtk, and notice a difference: the text-shadow of the blue class had less parameters.
The neon effect is actually achieved by adding shadows of different colors.
So I added the missing values, struggle a bit to choose the various colors but I ended with the following text-shadow that looked great!
Styling index.html
text-shadow: 0 0 2px #100c0f, 0 0 3px #61e2ff, 0 0 5px #61e2ff, 0 0 10px #03edf933;Adding speaker’s note to avoid forgetting something
When I do a “regular” presentation, you may not notice it when seeing me on stage or watching me on a video, but I heavily rely on my speaker’s notes. There’s my full speech there on each slide with some other information such as timing or “CLICK” when there is an animation or a transition to trigger at a specific moment in a sentence. The more I practice a talk, the less I need them but I’m relieved to just know they are there if needed.
Unfortunately, there are no “speaker’s notes” in VS Code and I was struggling to not forget something to say or to do.
The Todo+ attempt
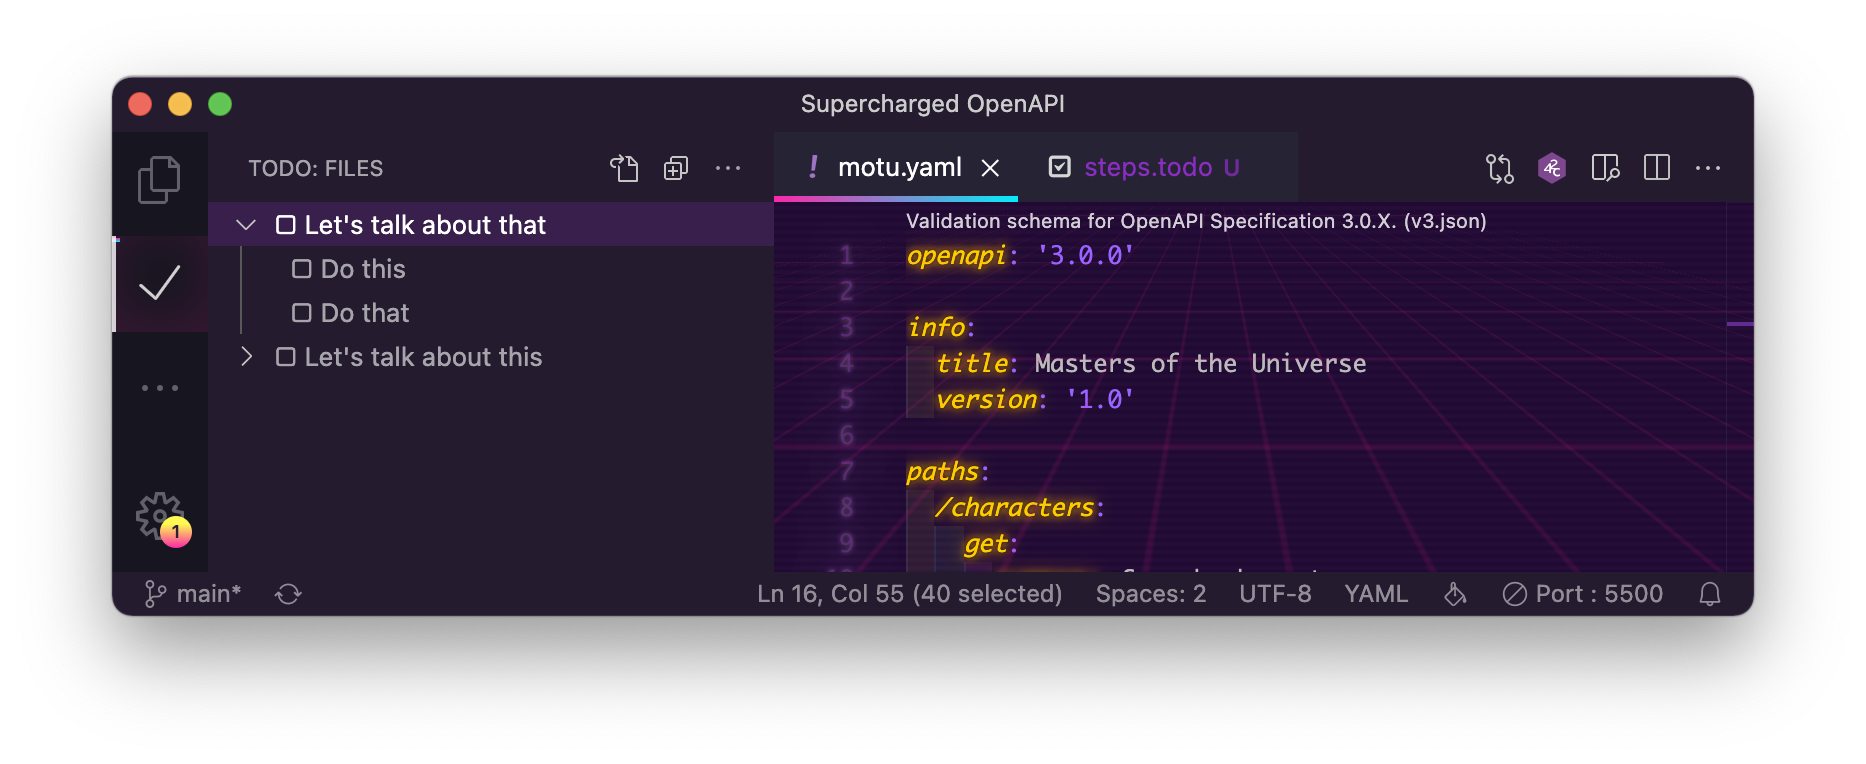
My first attempt in order to avoid forgetting something was to use the Todo+ extension. I created a steps.todo file basically containing my TOC. The idea was to have the Todo+ panel opened while coding the OpenAPI file. But that was not really convenient because it was visible to attendees and occupying space that I desperately needed. I though to hide it by cropping the VS Code window in OBS but that would have possible hidden a space where I could have wanted to show something. It was also not really convenient as, in order to keep the todo list usable for me, I had to open/close tasks folders.
The todo.html + iPad solution
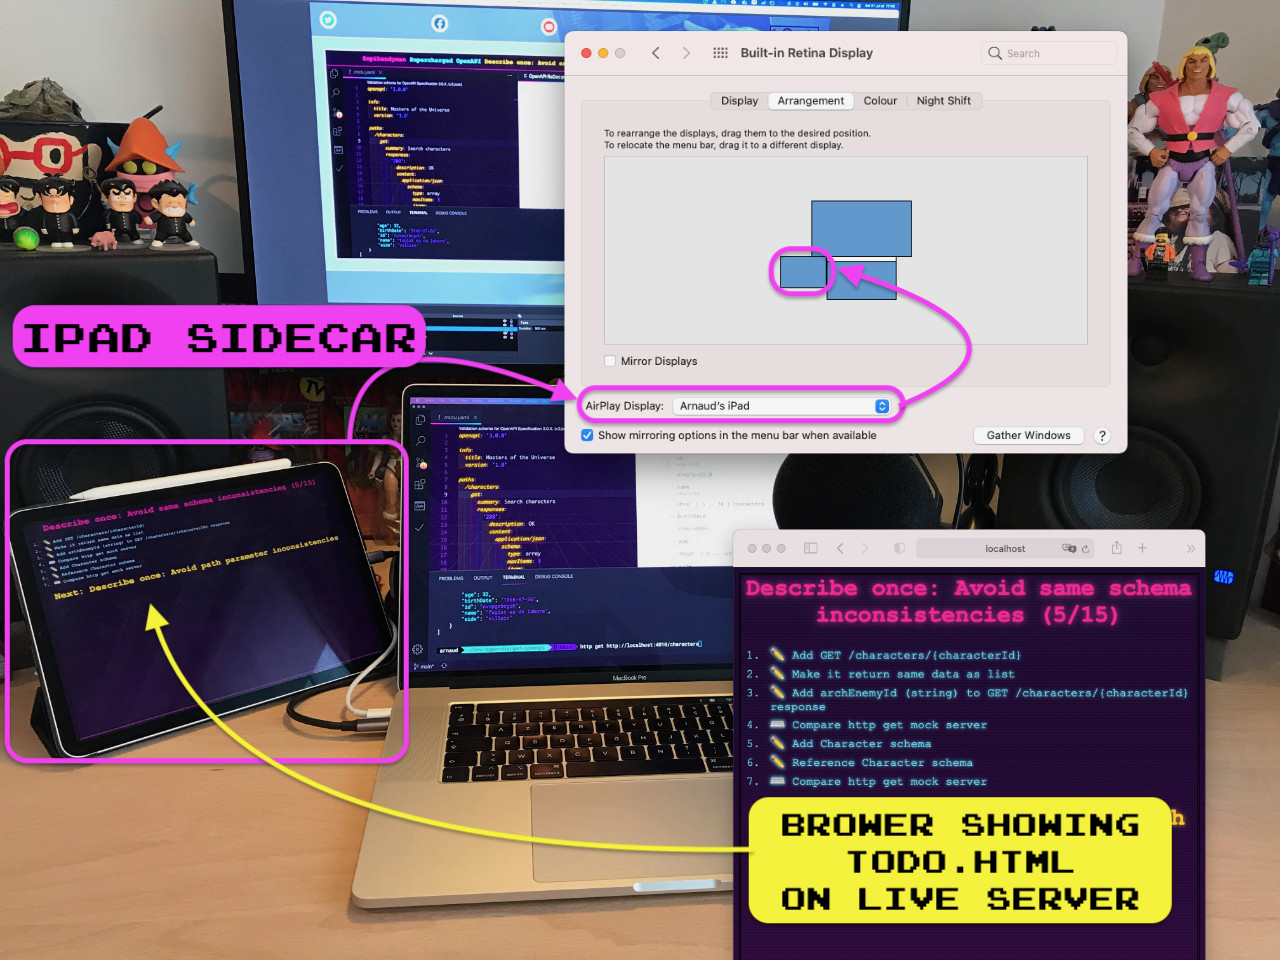
My second idea was to use almost the same trick as for the titles.
I added a todo.html file in each steps/step-x folder.
That way when I was using the “Next step” task, not only it was copying the index.html file of the step to the root folder, it was also copying the todo.html file too.
Having a browser showing http://localhost:5500/todo.html allowed to me have speaker’s notes updated at each step just like titles.
In order to keep those notes out of the way but still allowing me to look at them without loosing eye contact with my main screen and its web cam, I used the “sidecar” feature of my iPad. All that is needed is to plug the iPad to the MacBook with a USB cable then go to display preferences, choose the iPad as an Airplay display. Don’t forget to position it relatively to other screens as it is in reality in order to keep moving mouse to it simple. And you’re done you have a third (or second) display screen. Note that sidecar can be used over wifi but I never had satisfying result with it (maybe my wifi is not fast enough).
Note that as OBS is able to crop on a specific window, I probably could had both VS Code and todo on my MacBook display. But I wanted to test the side car, and it was working, so I moved on to next problem to solve.
I choose to use the same style as for the titles though is was only visible to my eyes. I also used various emojis to “type” the actions to do:
- ✏️ (pen) to write code
- ⌨️ (keyboard) to use the terminal
- 📺 (old TV) to show a rendering og the file (with Redoc or SwaggerUI)
- 💬 (Speech bubble) to say something
Heading to next problem
With all that I was totally satisfied with the style of the session and I was as comfortable as delivering a regular slide deck session thanks to my speaker’s note. In next post, I’ll show you how I was able to code at light speed.