

Twitter API v2 Tips and Tricks Series
Rendering simple text tweets with their authors
By Arnaud Lauret, April 25, 2022
Let’s learn to use Twitter v2 API tweets lookup operations to render simple text tweets and their author just like Twitter does. We’ll learn a few things about API design and API documentation in general and Postman based API documentation in particular in the making. I hope this will give you some ideas for the design and documentation of your API.
Twitter API v2 Tips and Tricks Series
This post is a “Twitter v2 API Tips And Tricks Post” in which I share with Postman collections the tips and tricks I learn while using Twitter v2 API. You can either:
- Read this post
- Read the collection documentation on Postman network
- Use this
 button to fork the collection directly in Postman
 - Get the collection from Github to import it in Postman. (Click on the “View complete collection documentation” link in lower right corner to see documentation in full screen after fork)
- What can we learn from tweets lookup error responses of Twitter v2 API?
- Rendering simple text tweets with their authors
We will concentrate on making the appropriate API calls and processing the data. We will not dive into the HandlebarJS + Bootstrap rendering, feel free to read this “How to use Bootstrap in Postman Visualizer” collection/post and look the tests scripts of the requests. You can also read more about how the collection works by looking at the Appendices section.
If you’re more interested in the learnings on API design and API documentation, you can jump directly to the API design and documentation take aways section.
Twitter v2 API tweets lookup
With Twitter v2 API, you can get tweets using the lookup operations GET /2/tweets/:tweetid (single tweet) and GET /2/tweets?ids=:tweetId1,tweetId2,...tweetId100 (multiple tweets). By requesting additional fields and the expansions of some of them, you can get the exact same data that are shown on Twitter website or mobile application. We’ll learn to use those operations to get the data needed and process them to render simple text tweets (without hastags, mentions, urls, medias, polls, …) and their author just like Twitter does.
Prerequisites
The collection requires an environment containing the variables defined in the table below. You can fork the following environments:
- Rendering simple text tweets with their authors Mock environment: Use a mock. It’s ready to use, there’s nothing to modify. You’ll be limited to the data the mock returns and won’t be able to modify the requests but all visualizations will work.
- Rendering simple text tweets with their authors Production environment: Use the real Twitter v2 API. It requires you to set a Twitter API bearer token (see below) but you’ll be able to choose the tweets used in the requests and modify the requests.
⛔
️Never store API tokens in initial value, use the current value. Read How to use API Keys to learn more.
| VARIABLE | DESCRIPTION |
|---|---|
| api_server_basepath | The server and base path of the API. For the production Twitter it’s https://api.twitter.com/2 and for the mock it’s https://46c813b3-7bd4-4bf7-9eac-1f56f2ccc813.mock.pstmn.io |
| twitter_token | (Only for production environment) A Twitter API bearer token (Read Twitter API documentation to get one) used in Authorization tab of the collection. Without this value you’ll get a surprise error message when sending a request. |
Getting the same data as Twitter
To achieve the following result, we’ll start by constructing a request to retrieve the data we need to render a simple text tweet and its author.

The pieces of data we need are:
- The tweet’s text
- Its creation date
- The name of the application that created it
- The author’s username
- Their name
- Their image profile URL
Getting a tweet with default data
By default, GET /tweets/:tweetId only returns the id and the text of a tweet.
Request
https://api.twitter.com/2/tweets/:tweetIdResponse
{
    "data": {
        "id": "1511761169727565829",
        "text": "This is a single line tweet"
    }
}
💡
In any response of Twitter v2 API, the returned data are encapsulated in a data property. This approach allows adding additional data and metadata without mixing them with the “real” business/subject matter data. The Twitter API design is similar to the JSON:API format.
Adding tweet’s creation date and source fields
We can add the tweet.fields query parameter to request the other tweet’s data we need, hence created_at (creation date) and source (name of the application that sent the tweet).
🔗
Check the Guess how Tweets lookup parameters work collection to discover how to guess the other possible values (and other parameters).
Request
https://api.twitter.com/2/tweets/:tweetId?tweet.fields=created_at,sourceResponse
{
    "data": {
        "id": "1511761169727565829",
        "text": "This is a single line tweet",
        "created_at": "2022-04-06T17:42:04.000Z",
        "source": "Twitter Web App"
    }
}
💡
Providing the possibility of selecting the field returned allows for reducing data volume and possibly the load on the server-side if the fields come from different subsystems. This is an approach that is quite useful but not often seen. It is similar to what JSON:API proposes with its sparse fields features.
Expanding author data
The only author’s piece of data that is directly available in a tweet is their id (author_id). Hopefully, we don’t need a separate call to the User lookup GET /users/:userId operation. Indeed, we can request to expand resources linked to a tweet by using the expansions query parameter.
💡
It’s pretty neat; it allows to get related data only when needed easily. Like with tweet.fields, it reduces data volume and possibly reduces response time and load on the server-side if the expanded elements come from other components.
So to expand the author’s data, we put author_id in the expansions query parameter. It’s a comma-separated list; you can provide multiple values like with tweet.fields. Doing that will magically add the author_id field to the tweet. If you wish to get the author_id without expanding the author data, add it to the tweet.fields query parameter as we did in the previous request.
Request
https://api.twitter.com/2/tweets/:tweetId?tweet.fields=created_at,source&expansions=author_idThe expanded elements will be returned in the includes property. In the case of user expanded data, they will be located in the includes.users list. We’ll see in a later request how to process them.
Response
{
    "data": {
        "id": "1511761169727565829",
        "text": "This is a single line tweet",
        "source": "Twitter Web App",
        "created_at": "2022-04-06T17:42:04.000Z",
        "author_id": "2943613557"
    },
    "includes": {
        "users": [
            {
                "id": "2943613557",
                "name": "API Handyman",
                "username": "apihandyman"
            }
        ]
    }
}
Adding user’s profile image URL field
We only got a user’s default data when expanding the author’s data, hence their id, username, and name. But we need the author’s profile image URL. We can request it by using the user.fields query parameter. It works like the tweet.fields query parameter but for user resources (the author in our case).
We set its value to profile_image_url to get the last piece of data we need. This additional field will go into the element representing the author in includes.users list.
Request
https://api.twitter.com/2/tweets/:tweetId?tweet.fields=created_at,source&expansions=author_id&user.fields=profile_image_urlResponse
{
    "data": {
        "id": "1511761169727565829",
        "text": "This is a single line tweet",
        "source": "Twitter Web App",
        "created_at": "2022-04-06T17:42:04.000Z",
        "author_id": "2943613557"
    },
    "includes": {
        "users": [
            {
                "id": "2943613557",
                "name": "API Handyman",
                "username": "apihandyman",
                "profile_image_url": "https://pbs.twimg.com/profile_images/966654273097490432/WPqaXZkf_normal.jpg"
            }
        ]
    }
}
Processing and rendering the data
Now we have all the data we need, let’s see how to process them to render simple text tweets and their authors à la Twitter.
Rendering a one line tweet
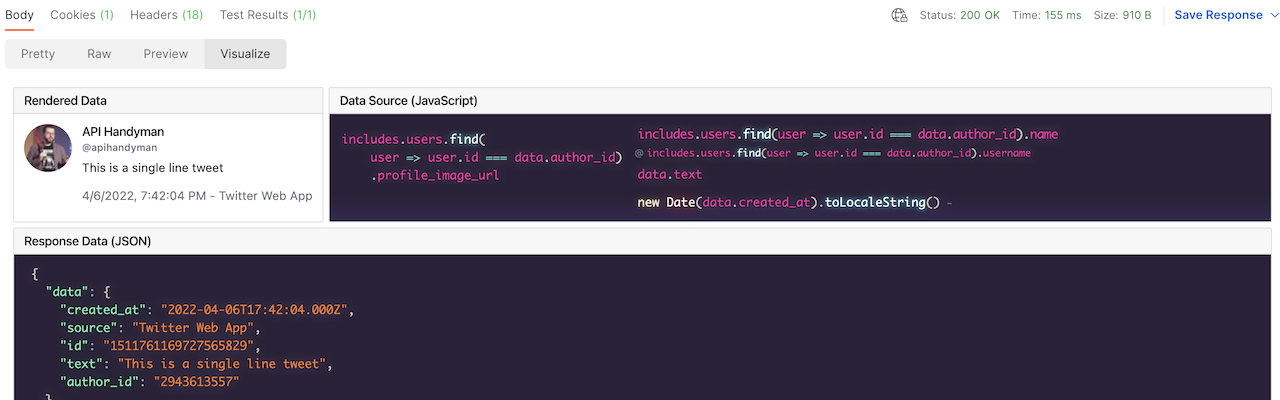
The directly related tweet data are pretty simple to get. The text (text), creation date (created_at), and name of the application that sent the tweet (source) are located in the data property that holds the requested tweet.
The only transformation done on these pieces of data is formating the ISO8601 created_at date from 2022-04-06T17:42:04.000Z to a local format.
💡
It is recommended to return dates with time precision (2022-04-06T17:42:04.000Z) only when needed (which is the case here) because dealing with timezones is not always simple. You’ll notice the Z timezone is used which is also recommended. Dates with time precision should always be returned using this UTC offset (Coordinated universal time).
For the author’s data, you’ll need to get them from the includes.users list. Though there’s only one user, for now, it is recommended to select the user by looking for the one having an id equal to the tweet’s author_id.
After sending the request, click on the Visualizer button in the response to see this rendering.

Request
https://api.twitter.com/2/tweets/:tweetId?tweet.fields=created_at,source&expansions=author_id&user.fields=profile_image_urlResponse
{
    "data": {
        "author_id": "2943613557",
        "created_at": "2022-04-06T17:42:04.000Z",
        "id": "1511761169727565829",
        "text": "This is a single line tweet",
        "source": "Twitter Web App"
    },
    "includes": {
        "users": [
            {
                "name": "API Handyman",
                "username": "apihandyman",
                "profile_image_url": "https://pbs.twimg.com/profile_images/966654273097490432/WPqaXZkf_normal.jpg",
                "id": "2943613557"
            }
        ]
    }
}
Test script
// Note: the HTTP status test is located in collection's Tests script


const response = pm.response.json();
if(response.data !== undefined){

    /*-----------------------------------------------*/
    /* Getting needed data from Twitter API response */
    /*-----------------------------------------------*/


    // The tweet author's data are returned only if expansions contains author_id
    // The expanded data are located in include.users list
    const author = response.includes.users.find(user => user.id === response.data.author_id);
    const tweet = {
        text: response.data.text, // Always returned
        created_at: response.data.created_at, // Returned if requested in user.fields
        source: response.data.source, // Returned if requested in user.fields
        author: {
            name: author.name, // Always returned
            username: author.username, //Always returned
            profile_image_url: author.profile_image_url // Returned if requested in user.fields
        }
    }

    /*------------*/
    /* Visualizer */
    /*------------*/

    // Preparing data for HandlebarJS template
    //----------------------------------------

    // The tweet data (shown in upper left card)
    const handlebarTweet =  {
        text: tweet.text,
        author: tweet.author,
        created_at: new Date(tweet.created_at).toLocaleString(), // Formatting ISO8601 date returned by the API
        source: tweet.source
    }

    // The source of each tweet piece of data (shown in upper right card)
    const handlebarTweetDataSource = {
        text: "data.text",
        created_at: "new Date(data.created_at).toLocaleString()",
        source: "data.source",
        author: {
            name: "includes.users.find(user => user.id === data.author_id).name",
            username: "includes.users.find(user => user.id === data.author_id).username",
            profile_image_url: `includes.users.find(
    user => user.id === data.author_id)
    .profile_image_url`
        }

    }

    // The raw json data returned by Twitter API
    const handlebarTweetJson = JSON.stringify(response, null, 2);

    // Bootstrap and prismsjs css and js
    const handlebarCssjs = {
        bootstrap: pm.collectionVariables.get("template_cssjs_bootstrap"),
        prismsjs: pm.collectionVariables.get("template_cssjs_prismjs")
    }

    // Putting everything in a single object
    // that will be passed to HandlebarJS template
    const handlebarData = {
        tweet: handlebarTweet,
        tweetDataSource: handlebarTweetDataSource,
        tweetJson: handlebarTweetJson,
        cssjs: handlebarCssjs
    };

    // Handlebar HTML template
    const handlebarTemplate = `
        <!-- CSS and JS -->
        {{{cssjs.bootstrap}}}
        {{{cssjs.prismsjs}}}
        <!-- Content -->
        <!-- Flex Container Start -->
        <div class="d-flex flex-column" style="font-size: larger;">
            <!-- First Row Start -->
            <div class="d-flex flex-row mb-2">
                <!-- Rendered Data Card Start -->
                <div class="card me-2">
                    <h5 class="card-header">Rendered Data</h5>
                    <div class="card-body">
                        <div class="d-flex flex-row align-items-stretch">
                            <div class="me-3">
                                <img src="{{tweet.author.profile_image_url}}" class="rounded-circle">
                            </div>
                            <div class="">
                                <h5 class="card-title">{{tweet.author.name}}</h5>
                                <h6 class="card-subtitle mb-2 text-muted">@{{tweet.author.username}}</h6>
                                <p class="card-text">{{tweet.text}}</p>
                                <p class="card-text text-muted">{{tweet.created_at}} - {{tweet.source}}</p>
                            </div>
                        </div>
                    </div>
                </div>
                <!-- Rendered Data Card End -->
                <!-- Data Source Card Start -->
                <div class="card me-2 flex-grow-1" >
                    <h5 class="card-header">Data Source (JavaScript)</h5>
                    <div class="card-body" style="background-image:linear-gradient(to bottom,#2a2139 75%,#34294f)">
                        <div class="d-flex flex-row align-items-stretch">
                            <div class="me-3">
                                <pre class="language-js p-0" style="background: transparent !important"><code class="border-0 p-0">{{tweetDataSource.author.profile_image_url}}</code></pre>
                            </div>
                            <div class="" >
                                <h5 class="card-title"><code class="language-js border-0" style="background: transparent !important">{{tweetDataSource.author.name}}</code></h5>
                                <h6 class="card-subtitle mb-2 text-muted">@<code class="language-js border-0" style="background: transparent !important">{{tweetDataSource.author.username}}</code></h6>
                                <p class="card-text"><code class="language-js border-0" style="background: transparent !important">{{tweetDataSource.text}}</code></p>
                                <p class="card-text text-muted"><code class="language-js border-0" style="background: transparent !important">{{tweetDataSource.created_at}}</code> - <code class="language-js border-0" style="background: transparent !important">{{data.source}}</code></p>
                            </div>
                        </div>
                    </div>
                </div>
                <!-- Data Source Card End -->
            </div>
            <!-- First Row End -->
            <!-- Second Row Start -->
            <div class="d-flex flex-row">
                <!-- Response JSON Data Card Start -->
                <div class="card me-2 mb-2 flex-grow-1">
                    <h5 class="card-header">Response Data (JSON)</h5>
                    <div class="card-body p-0">
                        <pre class="m-0 p-0"><code class="language-json border-0">{{{tweetJson}}}</code></pre>
                    </div>
                </div>
                <!-- Response JSON Data Card End -->
            </div>
            <!-- Second Row End -->
        </div>
        <!-- Flex Container End -->
    `;

    // Set visualizer template and data
    pm.visualizer.set(handlebarTemplate, handlebarData);
}
Rendering a multiline tweet
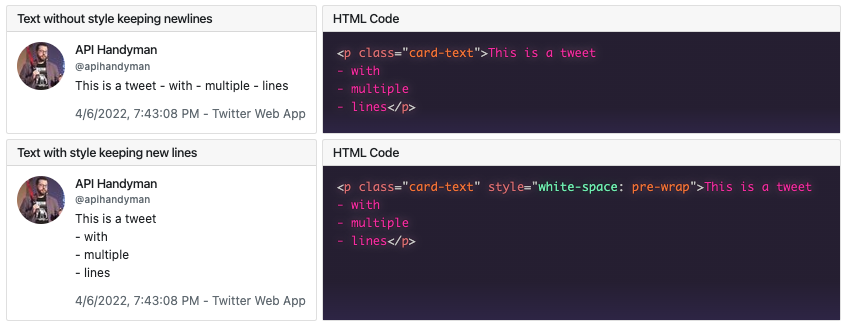
If you replace the tweet id with one corresponding to a multiline tweet the rendering may not work very well, as all the text is shown on one line. In order to keep the newlines \n that may be present in the text field, you can add the style white-space: pre-wrap to the HTML tag holding that piece of data (in a true application you would do that using a separate CSS and not using an inline style).
Request
https://api.twitter.com/2/tweets/:tweetId?tweet.fields=author_id,created_at,geo,id,source,text&expansions=author_id&user.fields=profile_image_urlResponse
{
    "data": {
        "text": "This is a tweet\n- with\n- multiple\n- lines",
        "created_at": "2022-04-06T17:43:08.000Z",
        "id": "1511761439261925384",
        "source": "Twitter Web App",
        "author_id": "2943613557"
    },
    "includes": {
        "users": [
            {
                "profile_image_url": "https://pbs.twimg.com/profile_images/966654273097490432/WPqaXZkf_normal.jpg",
                "id": "2943613557",
                "username": "apihandyman",
                "name": "API Handyman"
            }
        ]
    }
}
After sending the request, click on the Visualizer button in the response to see this rendering.
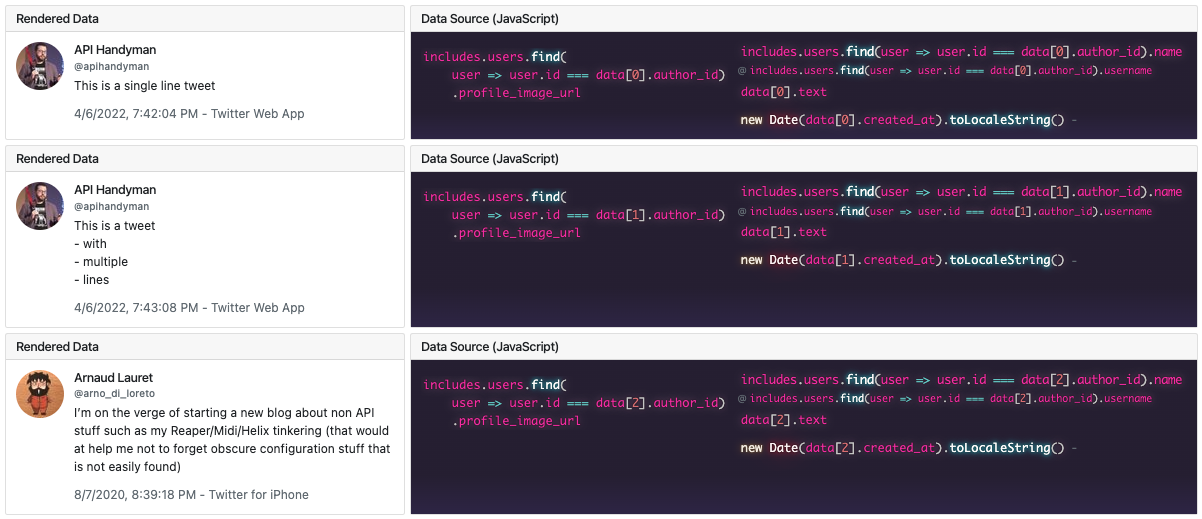
Rendering multiple tweets from multiple authors
When retrieving multiple tweets from different authors, it works the same. The only difference is that when using GET /tweets the data field becomes a list to hold more than one tweet. We just have to go through that list and process each element just like we did with a single tweet.
Request
https://api.twitter.com/2/tweets?ids={{tweet_id_text}},{{tweet_id_text_multiline}},{{tweet_id_other_author}}&tweet.fields=author_id,created_at,geo,id,source,text&expansions=author_id&user.fields=profile_image_urlIn the provided example, there are 3 tweets from 2 different authors in the list. That means the includes.users list now contains the data for 2 authors, but it does not affect the way we look for their data. Looking for the user whose id matches some author_id works the same.
Response
{
    "data": [
        {
            "text": "This is a single line tweet",
            "source": "Twitter Web App",
            "id": "1511761169727565829",
            "created_at": "2022-04-06T17:42:04.000Z",
            "author_id": "2943613557"
        },
        {
            "text": "This is a tweet\n- with\n- multiple\n- lines",
            "source": "Twitter Web App",
            "id": "1511761439261925384",
            "created_at": "2022-04-06T17:43:08.000Z",
            "author_id": "2943613557"
        },
        {
            "text": "I’m on the verge of starting a new blog about non API stuff such as my Reaper/Midi/Helix tinkering (that would at help me not to forget obscure configuration stuff that is not easily found)",
            "source": "Twitter for iPhone",
            "id": "1291806136774074368",
            "created_at": "2020-08-07T18:39:18.000Z",
            "author_id": "1327524403"
        }
    ],
    "includes": {
        "users": [
            {
                "username": "apihandyman",
                "name": "API Handyman",
                "profile_image_url": "https://pbs.twimg.com/profile_images/966654273097490432/WPqaXZkf_normal.jpg",
                "id": "2943613557"
            },
            {
                "username": "arno_di_loreto",
                "name": "Arnaud Lauret",
                "profile_image_url": "https://pbs.twimg.com/profile_images/1342523325969477632/AuqZ5guV_normal.jpg",
                "id": "1327524403"
            }
        ]
    }
}
💡
Having put the expanded author on the tweet is a very good design approach. It can greatly reduce the data volume in Twitter’s use case. Imagine retrieving a hundred tweets sent by a single person. Without that design, the data volume would be augmented by 99 x the author’s data volume. The downside is that some work is needed on the consumer side to put everything together, but it’s not that complicated to do. There’s a balance to find between providing ready-to-use data and data volume/server load, in this case, it’s pretty good.
Test script
// Note: the HTTP status test is located in collection's Tests script

const response = pm.response.json();
if(response.data !== undefined){

    /*-----------------------------------------------*/
    /* Getting needed data from Twitter API response */
    /*-----------------------------------------------*/

    const tweets = [];
    // When using GET /tweets, response.data is a list
    response.data.forEach(dataItem => {
        // The tweet author's data are returned only if expansions contains author_id
        // The expanded data are located in include.users list at root level
        // (that means includes are not at each tweet level)
        const author = response.includes.users.find(user => user.id === dataItem.author_id);
        const tweet = {
            text: dataItem.text, // Always returned
            created_at: dataItem.created_at, // Returned if requested in user.fields
            source: dataItem.source, // Returned if requested in user.fields
            author: {
                name: author.name, // Always returned
                username: author.username, //Always returned
                profile_image_url: author.profile_image_url // Returned if requested in user.fields
            }
        }
        tweets.push(tweet);
    });

    /*------------*/
    /* Visualizer */
    /*------------*/

    // Preparing data for HandlebarJS template
    //----------------------------------------

    const handlebarTweetsAndDataSources = [];
    tweets.forEach(function callback(tweet,index){
        // The tweets data (shown in first column cards)
        const handlebarTweet = {
            text: tweet.text,
            author: tweet.author,
            created_at: new Date(tweet.created_at).toLocaleString(), // Formatting ISO8601 date returned by the API
            source: tweet.source
        };
        // The source of each tweet piece of data (shown in upper right card)
        const handlebarTweetDataSource = {
            text: `data[${index}].text`,
            created_at: `new Date(data[${index}].created_at).toLocaleString()`,
            source: `data[${index}].source`,
            author: {
                name: `includes.users.find(user => user.id === data[${index}].author_id).name`,
                username: `includes.users.find(user => user.id === data[${index}].author_id).username`,
                profile_image_url: `includes.users.find(
    user => user.id === data[${index}].author_id)
    .profile_image_url`
            }
        };
        handlebarTweetsAndDataSources.push({
            tweet: handlebarTweet,
            tweetDataSource: handlebarTweetDataSource
        })
    });

    // The raw json data returned by Twitter API
    const handlebarTweetsJson = JSON.stringify(response, null, 2);

    // Bootstrap and prismsjs css and js
    const handlebarCssjs = {
        bootstrap: pm.collectionVariables.get("template_cssjs_bootstrap"),
        prismsjs: pm.collectionVariables.get("template_cssjs_prismjs")
    }

    // Putting everything in a single object
    // that will be passed to HandlebarJS template
    const handlebarData = {
        tweetsAndDataSources: handlebarTweetsAndDataSources,
        tweetsJson: handlebarTweetsJson,
        cssjs: handlebarCssjs
    };
console.log(handlebarData)
    // Handlebar HTML template
    const handlebarTemplate = `
        <!-- CSS and JS -->
        {{{cssjs.bootstrap}}}
        {{{cssjs.prismsjs}}}
        <!-- Content -->
        <!-- Flex Container Start -->
        <div class="d-flex flex-column" style="font-size: larger;">
            {{#each tweetsAndDataSources}}
            <!-- First Row Start -->
            <div class="d-flex flex-row mb-2">
                <!-- Rendered Data Card Start -->
                <div class="card me-2" style="width:40rem;">
                    <h5 class="card-header">Rendered Data</h5>
                    <div class="card-body">
                        <div class="d-flex flex-row align-items-stretch">
                            <div class="me-3">
                                <img src="{{tweet.author.profile_image_url}}" class="rounded-circle">
                            </div>
                            <div class="">
                                <h5 class="card-title">{{tweet.author.name}}</h5>
                                <h6 class="card-subtitle mb-2 text-muted">@{{tweet.author.username}}</h6>
                                <p class="card-text" style="white-space: pre-wrap">{{tweet.text}}</p>
                                <p class="card-text text-muted">{{tweet.created_at}} - {{tweet.source}}</p>
                            </div>
                        </div>
                    </div>
                </div>
                <!-- Rendered Data Card End -->
                <!-- Data Source Card Start -->
                <div class="card me-2 flex-grow-1" >
                    <h5 class="card-header">Data Source (JavaScript)</h5>
                    <div class="card-body" style="background-image:linear-gradient(to bottom,#2a2139 75%,#34294f)">
                        <div class="d-flex flex-row align-items-stretch">
                            <div class="me-3">
                                <pre class="language-js p-0" style="background: transparent !important"><code class="border-0 p-0">{{tweetDataSource.author.profile_image_url}}</code></pre>
                            </div>
                            <div class="" >
                                <h5 class="card-title"><code class="language-js border-0" style="background: transparent !important">{{tweetDataSource.author.name}}</code></h5>
                                <h6 class="card-subtitle mb-2 text-muted">@<code class="language-js border-0" style="background: transparent !important">{{tweetDataSource.author.username}}</code></h6>
                                <p class="card-text"><code class="language-js border-0" style="background: transparent !important">{{tweetDataSource.text}}</code></p>
                                <p class="card-text text-muted"><code class="language-js border-0" style="background: transparent !important">{{tweetDataSource.created_at}}</code> - <code class="language-js border-0" style="background: transparent !important">{{data.source}}</code></p>
                            </div>
                        </div>
                    </div>
                </div>
                <!-- Data Source Card End -->
            </div>
            <!-- First Row End -->
            {{/each}}
            <!-- Second Row Start -->
            <div class="d-flex flex-row">
                <!-- Response JSON Data Card Start -->
                <div class="card me-2 mb-2 flex-grow-1">
                    <h5 class="card-header">Response Data (JSON)</h5>
                    <div class="card-body p-0">
                        <pre class="m-0 p-0"><code class="language-json border-0" style="overflow:scroll">{{{tweetsJson}}}</code></pre>
                    </div>
                </div>
                <!-- Response JSON Data Card End -->
            </div>
            <!-- Second Row End -->
        </div>
        <!-- Flex Container End -->
    `;

    // Set visualizer template and data
    pm.visualizer.set(handlebarTemplate, handlebarData);
}
After sending the request, click on the Visualizer button in the response to see this rendering.
API design and documentation take aways
Retrieving, processing, and rendering simple text tweets should be quite simple now that you have read this tutorial. Let’s recap some interesting API design and documentation takeaways.
API Design
Here’s what we can learn from Twitter v2 API design:
- Encapsulating data in a
data(or other named) field allows adding additional data and metadata without mixing them with the “real” business/subject matter data. The Twitter API design is similar to the JSON:API format. - Providing the possibility of selecting the field returned and the sub-ressources expanded allows to reduce data volume and also possibly reduce the response time and the load on the server-side if those data come from different subsystems. This is an approach that is quite useful but not often seen. It is similar to what the JSON:API format proposes.
- Putting the expanded sub-resources at the root level and not directly in each element allows for reducing data volumes.
- Always keep a balance between solving problems (data volume, response time, server loads) and bothering consumers. In the Twitter case, that balance is very good when it comes to making the link between the tweets and the expanded users.
- Using ISO8601 date format with UTC timezone is a good practice (I recommend reading this post by Jason Harmon on the topic: The 5 laws of API dates and times)
API Documentation
API documentation is often split in 2 separate types (though there are actually more, but that’s another story): reference documentation and use case documentation. We can compare the reference documentation to ingredients if the use case documentation is a recipe. With this tutorial, I tried to create the ideal use case documentation I look for when using APIs. It’s far from perfect, but it’s a good start.
Here are my takeaways on the topic:
- Even a single operation can benefit from use-case-oriented documentation. In this case, I think it’s useful to understand how the Twitter API works globally (and avoid needless API calls, to get the tweet author for instance).
- Use-case-oriented documentation should not only cover how to make API calls but also how to process the returned data. That’s especially true in that case because data need to be processed to be put together (though it’s not that complicated work).
- When creating Postman collection-based documentation, providing several requests to show step by step how to build a complex one seems interesting. It allows explaining several features separately.
- Providing annotated examples of code in test scripts showing how to manipulate the returned data is also interesting.
- Providing a mock server returning the data needed by the request of the collection allows avoiding requiring creating an account to use the API (Twitter in this case). It has some limitations (not really possible to modify the requests) but all requests and their visualizations work.
- And last but not least, taking advantage of the visualizer to show in a more visual way how to manipulate the returned data looks definitely promising.
I will definitely push more in those directions for my next API tutorials.
Appendices
Notes about the collection
The collection takes advantage of
- Environment and collection variables
- Collection level Pre-Request and Test scripts
- Request level test scripts
- Response visualizers
- Third-party CSS and JS in the response visualizers
Environment variables
The collection requires an environment containing the variables defined in the table below. You can fork the following environments:
- Rendering simple text tweets with their authors Mock environment: Use a mock. It’s ready to use, there’s nothing to modify. You’ll be limited to the data the mock returns and won’t be able to modify the requests but all visualizations will work.
- Rendering simple text tweets with their authors Production environment: Use the real Twitter v2 API. It requires you to set a Twitter API bearer token (see below) but you’ll be able to choose the tweets used in the requests and modify the requests.
⛔
️Never store API tokens in initial value, use the current value. Read How to use API Keys to learn more.
| VARIABLE | DESCRIPTION |
|---|---|
| api_server_basepath | The server and base path of the API. For the production Twitter it’s https://api.twitter.com/2 and for the mock it’s https://46c813b3-7bd4-4bf7-9eac-1f56f2ccc813.mock.pstmn.io |
| twitter_token | (Only for production environment) A Twitter API bearer token (Read Twitter API documentation to get one) used in Authorization tab of the collection. Without this value you’ll get a surprise error message when sending a request. |
Collection variables
The collection uses the following collection variables in the requests:
| VARIABLE | DESCRIPTION |
|---|---|
| tweet_id_text | A real working tweet id. Feel free to update with one of your likings. To get this id, go to the Twitter website and open a tweet by clicking on it. You’ll see a URL like this one https://twitter.com/apihandyman/status/1387820661742112771 , the id is number number after status. Used in all requests except “Rendering a multiline tweet”. |
| tweet_id_text_multiline | The id of a multiline tweet. Feel free to update with one of your likings. To get this id, go to the Twitter website and open a tweet by clicking on it. You’ll see a URL like this one https://twitter.com/apihandyman/status/1387820661742112771 , the id is number number after status. Used only in the “Rendering a multiline tweet” and “Rendering multiple tweets from multiple authors” requests. |
| tweet_id_other_author | The id of a tweet of a different author than the previous ones. Feel free to update with one of your likings. To get this id, go to the Twitter website and open a tweet by clicking on it. You’ll see a URL like this one https://twitter.com/apihandyman/status/1387820661742112771 , the id is number number after status. Used only in the “Rendering multiple tweets from multiple authors” requests. |
There are other collection variables used by Pre-request and Test scripts that shouldn’t be modified (unless you want to break things):
| VARIABLE | DESCRIPTION |
|---|---|
| expected_environment_variables | The list of environment variable needed to make the collection work. Used by the collection level Pre-request script to avoid sending requests without the Twitter API bearer token. Look at this collection/post to learn more about that Postman trick (though the version here is slightly modified). |
| expected_environment_variables_defaults | Contains the default values of expected_environment_variables. If you forked the environment that comes with that collection without updating the Twitter API bearer token value, the collection Pre-request script will tell you. |
| template_cssjs_bootstrap | Bootstrap CSS and JS used in the Visualizer to simply bring a beautiful style to HTML Handlebar templates. Look at this collection/post to learn more about that Postman trick. |
| template_cssjs_prismjs | PrismJS CSS and JS used to style the code samples in the HTML Handlebar templates used in the visualizer. It’s the same Postman trick as the bootstrap one (importing third party CSS and JS in Visualizer). |
Collection level pre-request script
The collection level pre-request script contains some code that runs before sending any of the collection’s requests. Here, it checks an environment containing appropriate variables has been selected. It takes advantage of the expected_environment_variables and expected_environment_variables_defaults collection variables for its configuration.
Collection level tests script
The collection level tests script contains some code that runs after any of the collection’s requests has returned. Here it checks there’s no error. Note, at the moment of writing, there’s a bug in Twitter v2 API, a GET /tweets/:tweeitId with a non-existing tweet id returns a 200 OK (with an errors property) instead of a 404 Not Found.
Request level tests script
The request level tests script contains code that runs after the request has returned. Here, in the requests of the “Processing and rendering the data” folder, if some data is returned by the Twitter API (data field is not undefined), the data are processed and then passed to a HandlebarJS template for the visualizer.
Response visualizer
The visualizer code (in request level tests scripts) takes advantage of the standard HandlebarJS templates but adds some styling with:
Check the “How to use Bootstrap in Postman visualizer” collection/post to learn more about how to use third-party CSS and JS in visualizer templates.