

Automate all the things (like Cloudflare cache purge) with Github actions, Postman and APIs
By Arnaud Lauret, June 30, 2021
What if I tell you can run Postman collection inside Github Actions and so easily automate all the things as long as they provide APIs? Sounds interesting right? So let me show you how I migrated my Jekyll blog publication workflow to Github Actions and how I used Postman collection to clear my Cloudflare cache. Bonus: You may also learn a few things about DX and API design.
Migrating to Github Actions and solving an old problem
Since 2016, the API Handyman blog is powered by Jekyll, built by travis-ci.org, hosted on Github Pages and cached with Cloudflare CDN. On May 31, 2021, travis-ci.org has been shot down. This has been announced for quite a long time… but I managed to totally forgot to do something about it; I actually realized it simply because my 1st of June’s post has not been published. I was going to migrate to travis-ci.com but because (or thanks) to an obscure bug I wasn’t able to do it … and as I wanted to test Github Actions, I took the few necessary minutes to switch my build on it, and that was a blast. Ready to use actions that you can build upon, clear and simple format, good documentation, I was totally delighted.
As changing the build system was faster than expected, I decided to tinker a bit more and solve a problem I had with my system: to ensure publication, I had to go to Cloudflare dashboard and manually clear the cache. If by chance Cloudflare propose an API, I thought I could include clearing cache after the build with a curl command, but as always I did a little bit more than that.
Setting up a Jekyll Github Action Workflow
Migrating from travis-ci.org to Github actions was done at the speed of light. I will not go through all details, Github Actions, format, UI and documentation are quite clear, but I will show you a few tips I discovered while setting up my first Github Workflow (yes, naming is hard, it’s called Github Actions but you create … Workflows, actually “actions” seems to be the reusable components that you can use in workflows).
Default Jekyll workflow
Starting with Github Actions as a total beginner is dead simple:
- Go to your repository
- Click on the Actions tab, you should see a “Get started with Github Actions” page
- Scroll down to “Continuous integration workflows” and look for “Jekyll”
That should create the following workflow in .github/workflows/jekyll.ymlin your repository:
Default Jekyll workflow
name: Jekyll site CI

on:
  push:
    branches: [ main ]
  pull_request:
    branches: [ main ]

jobs:
  build:

    runs-on: ubuntu-latest

    steps:
    - uses: actions/checkout@v2
    - name: Build the site in the jekyll/builder container
      run: |
        docker run \
        -v $:/srv/jekyll -v $/_site:/srv/jekyll/_site \
        jekyll/builder:latest /bin/bash -c "chmod -R 777 /srv/jekyll && jekyll build --future"
According to the on property, This workflow will be triggered by pushes and pull requests on main branch.
It contains a single job (in jobs) named build which is composed of 2 steps:
- The first one checkouts the repo taking advantage of the
actions/checkout@v2action (that means you can call actions insideactionsworkflows! Check the Market Place, there are dozens of them already) - The second step
runs a jekyll build using Docker (that will prove to be useful) but does not publish anything (you can basically run any Linux commands withrun)
Customizing Jekyll workflow
My publication workflow is quite simple, each Wednesday à noon (UTC) or on demand, I want to:
- Checkout repository on default branch
- Run Jekyll build
- Commit build’s result on gh-pages branch
So I started by customizing the on section:
- To
schedulebuild every Wednesday at noon using cron syntax (Schedule Events documentation) - And I also activated “on demand” execution with the empty
workflow_dispatch(Manual Events documentation)
Customized Jekyll workflow
name: Publish

on:
  schedule:
    - cron: "0 12 * * WED"
  workflow_dispatch:
Then I customized (and renamed) the build job as build_and_publish:
- I added
PUBLISH_BRANCH_FOLDER(target folder for build) andPUBLISH_BRANCH(publication branch) environment variables (documentation) inenv. They are later used with the${{env.VARIABLE_NAME}}syntax. - I tweaked the checkout step to make it faster by only downloading the last version of the code (
fetch-depth: 1) - I removed the
--futureflag on Jekyll build step to avoid having future date being published (actually I did that after realizing that future post had been published) - I modified build target directory (the second
-vin the Docker command) and set it to${{ github.workspace }}/${{env.PUBLISH_BRANCH_FOLDER}}. Thegithub.workspaceis a variable of github context, this context provides information about the workflow and the event that triggered it. - And finally, I added the publication step which consists in pushing build on
gh-pages. This is done using the wonderful JamesIves/github-pages-deploy-action which can take the content of any folder and push it on any repository’s branch (theclean: trueis a very convenient option that removes what should be removed from the target branch based on source folder)
Customized Jekyll workflow
jobs:
build_and_publish:
env:
PUBLISH_BRANCH: gh-pages
PUBLISH_BRANCH_FOLDER: _site
runs-on: ubuntu-latest
steps:
- name: ⬇️ Checkout current branch
uses: actions/checkout@v2
with:
fetch-depth: 1
- name: 👷🏻♂️ Build with jekyll/builder container
run: |
docker run \
-v ${{ github.workspace }}:/srv/jekyll \
-v ${{ github.workspace }}/${{env.PUBLISH_BRANCH_FOLDER}}:/srv/jekyll/_site \
jekyll/builder:latest /bin/bash -c "chmod -R 777 /srv/jekyll && jekyll build"
- name: 🚀 Push on ${{env.PUBLISH_BRANCH}}
uses: JamesIves/[email protected]
with:
branch: ${{env.PUBLISH_BRANCH}} # The branch the action should deploy to.
folder: ${{ github.workspace }}/${{env.PUBLISH_BRANCH_FOLDER}} # The folder the action should deploy.
clean: true
commit-message: PublishClearing Cloudflare cache by API with Postman
Now that the blog is published, let’s see how to clear Cloudflare cache.
Spoiler: Do Cloudflare offers a good DX (Developer eXperience)? Yes, definitely, I was able to do what I wanted in a matter of minutes.
Finding the API documentation
I opened cloudflare.com website to locate their API documentation but was quite disappointed, no mention of any Cloudflare API at all. That was not starting well; don’t do that at home, if you have API(s) advertize them on your homepage. Hopefully, I found the link to Cloudflare API documentation once I logged in my account and … scrolled all the way down to the page footer.

To be honest, I could simply have googled Clouflare API and I would have arrived directly on the documentation, searching “company name api” is the best way to find a company’s API documentation.
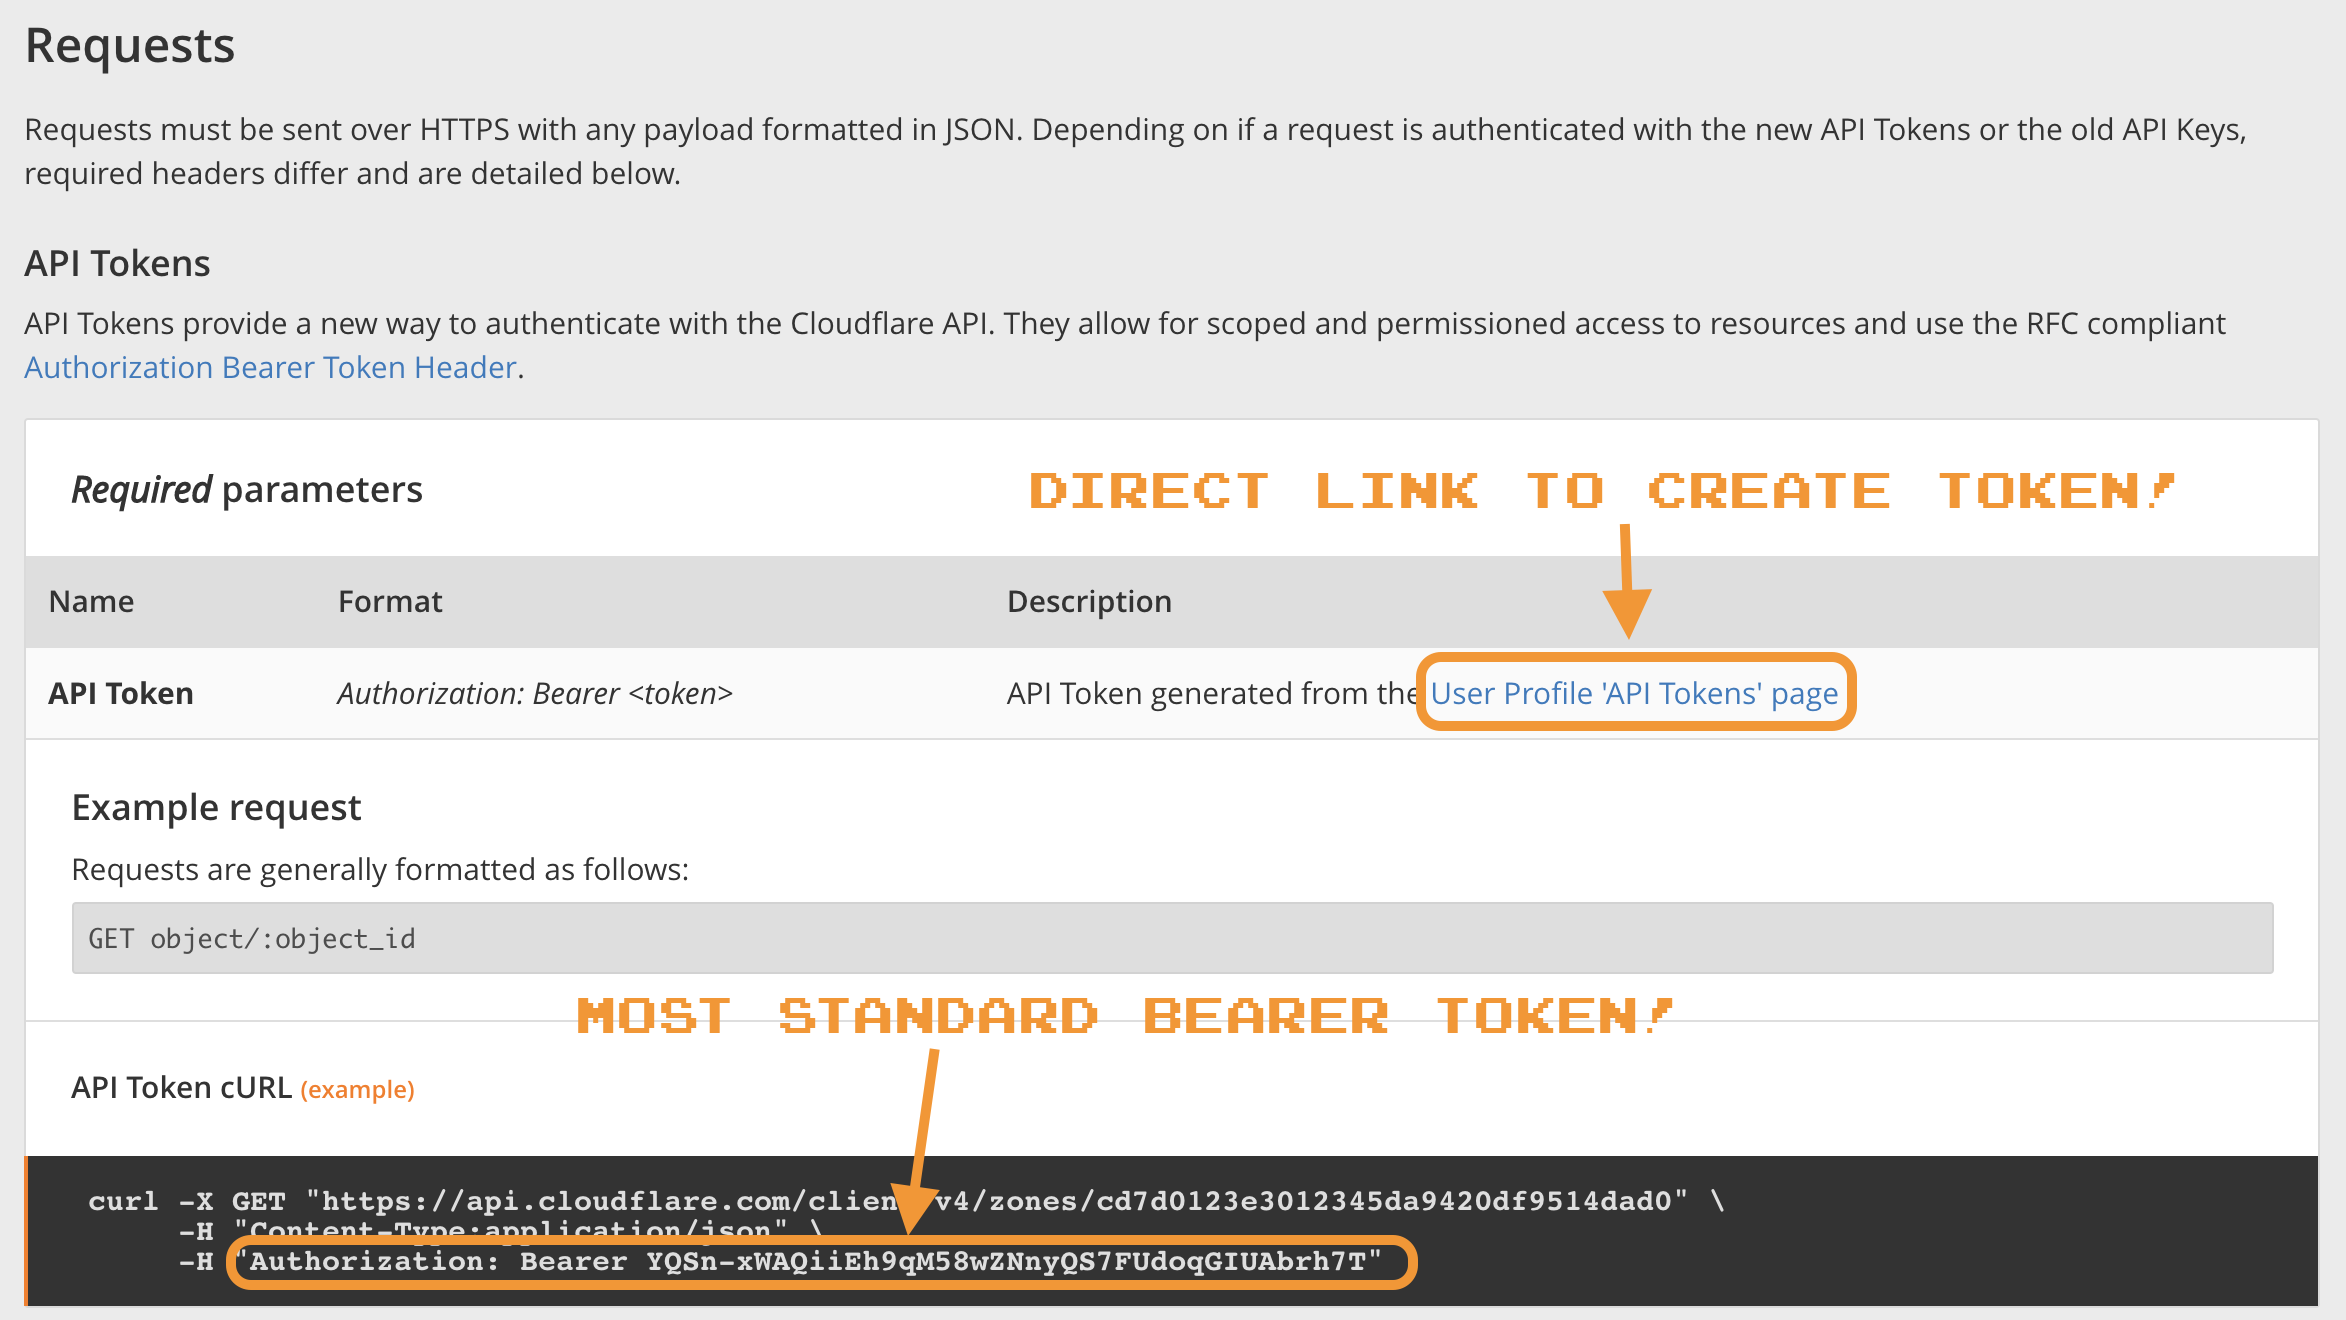
Though, Cloudflare doesn’t advertize them on their homepage, they did a great job on their APIs. Crystal clear documentation going straight to the point; it took me a few seconds to arrive to the “Getting start -> Requests” section explaining how to make API calls using an API token. Icing on the cake: the direct link to your user profile for token configuration.
Configuring an access token
Once arrived on the API Tokens tab of your profile, click on the Create Token blue button, the following page will appear:
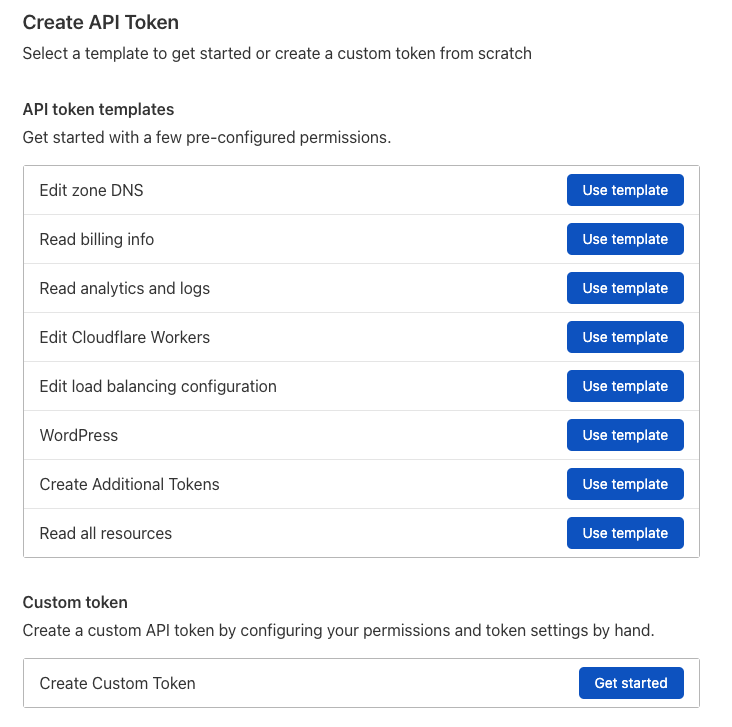
Cloudflare allows to create tailor made tokens with only the permissions you actually need which is great for security. The create token page propose pre-configured token templates which is good, but there was no template matching my need, so I created a custom token.
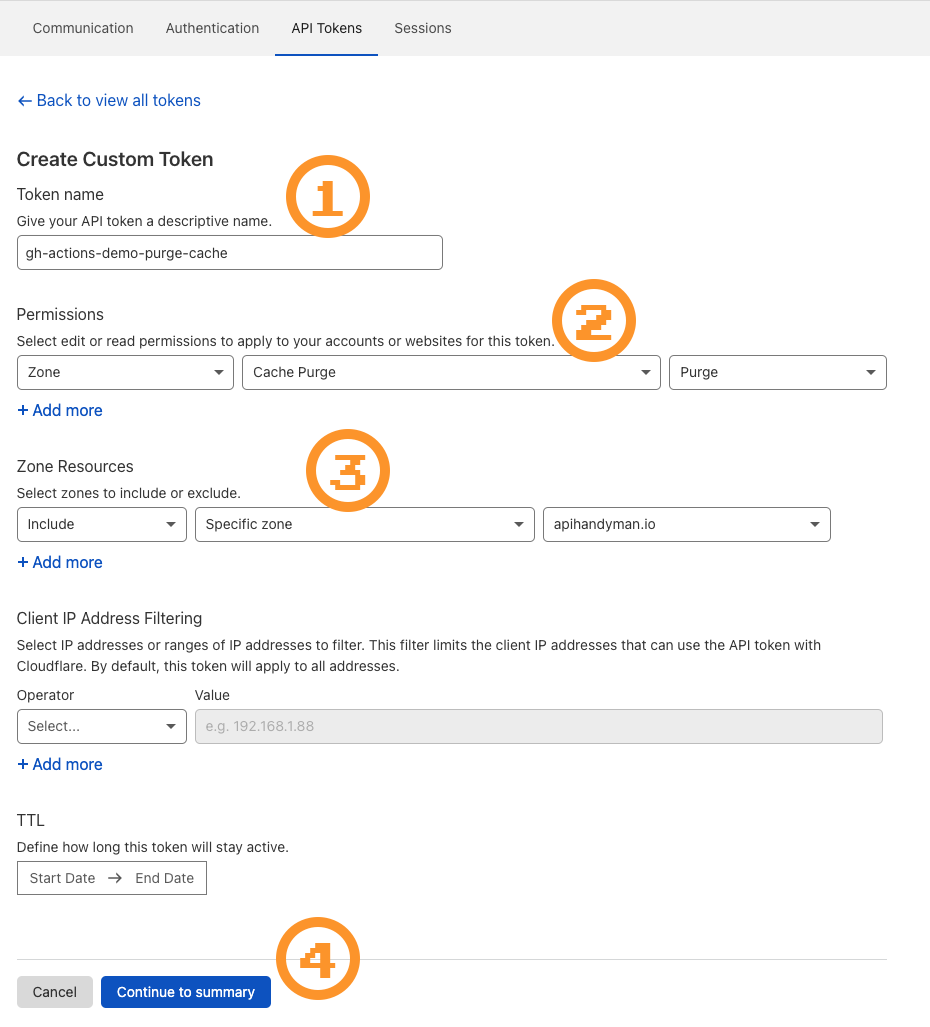
Configuring a custom token
Configuring an access token is dead simple:
- Give it a name (useful when wanting to delete a token)
- Select permissions Zone -> Cache Purge -> Purge
- Select resources to purge, I chose to include only the apihandyman.io domain
- Click on continue to summary
Cloudflare allows to generate tokens with really fine grain permissions and the way they are organized and what you can do with them is crystal clear. Github should get inspired by this, their token configuration is light years behind this.
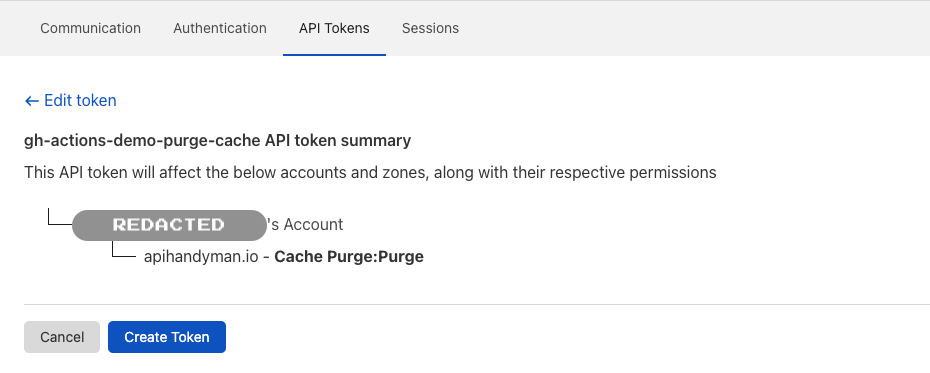
Checking configuration
Once configuration is done, you’ll get a summary of permissions granted by this token.
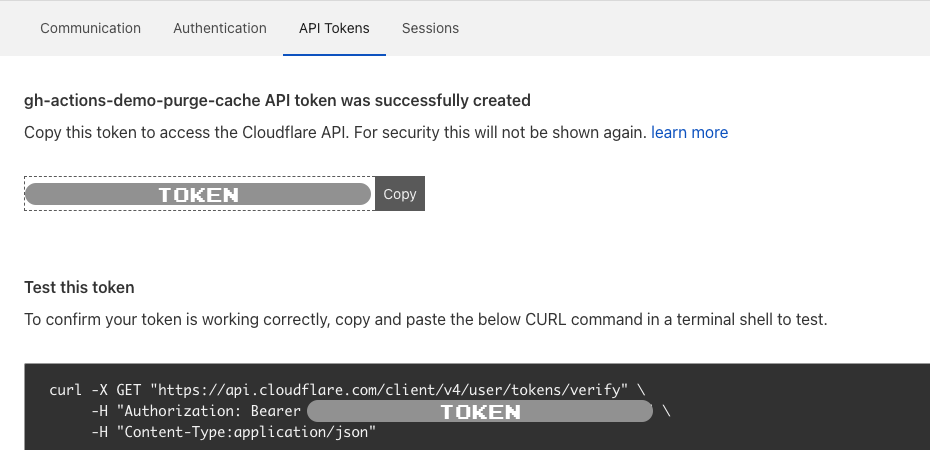
Token created
And when token is created, you can copy it to use it, but quite convenient, you get a ready to use curl command to check it actually works (I wouldn’t have designed the endpoint like this though, but that’s not the point here).
No interactive documentation is not a problem here
Ok, Cloudflare could propose an interactive documentation using pre-generated tokens. But in that context and as the API is quite simple I was not annoyed at all by the static documentation. I even wonder if that would be a good idea to have such dynamic documentation based on the terrible actions you can trigger with their API.
Verifying the Token
Instead of using curl to verify token, I used Postman.
If you’re not familiar with Postman, follow the detailed steps described in my Batch (Github) API calls with CSV and Postman to setup workspace, collection and environment variables
I created a Cloudflare workspace and a Cloudflare Clear Cache collection in Postman to tinker with the Cloudflare API.
I added a collection variable called root containing the url (https://api.cloudflare.com/client/v4) of Cloudflare API
And I added a Cloudflare environment containing my newly created token (and saved and selected it in the upper right environment drop list!).
In the collection, I set up Authorization type to Bearer Token (as stated by Cloudflare API documentation) and set the Token value to {{token}}.
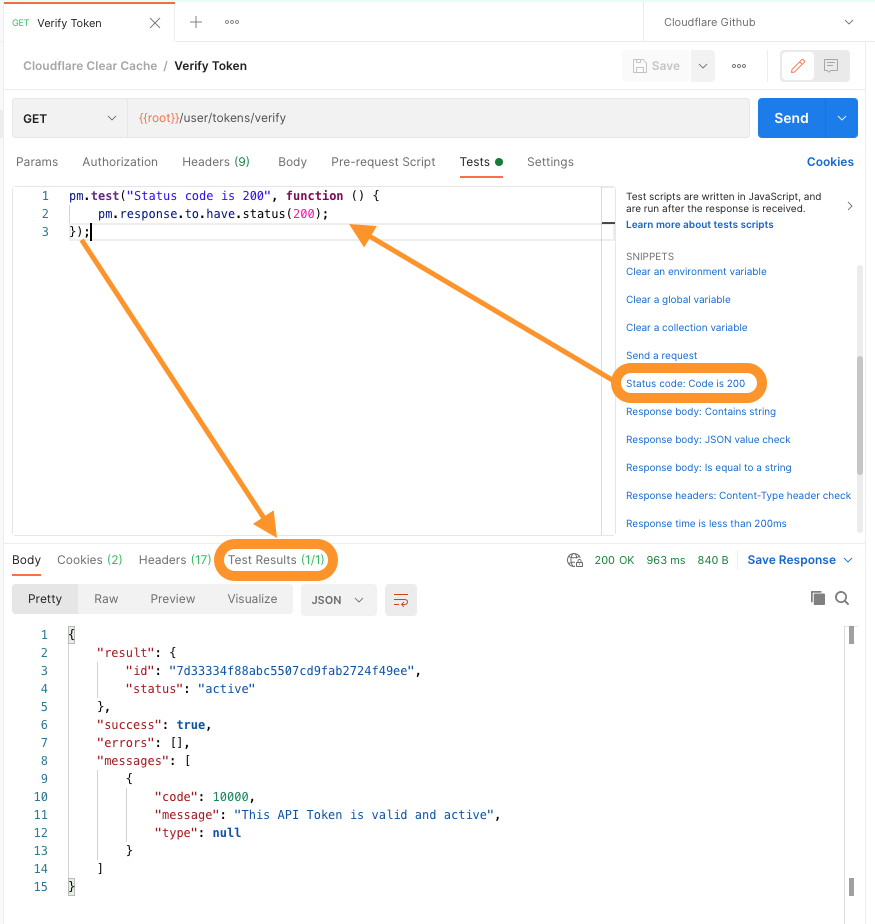
And the I created a Verify Token request as a GET {{root}}/user/tokens/verify.
Before hitting the Send button, I added a Test snippet to check that the response is a 200 OK by going to the request’s Tests tab then click on the “Status code: Code is 200” snippet as shown below.
Reading purge cache documentation
Now that we’re all set to make Cloudflare API calls, let’s see how to purge cache. Finding out how to do that is again dead simple, go to Cloudflare API documentation, type “purge” in the top left search box, and click on “Purge All Files”. Note that depending on your Cloudflare subscriptions, you can get access to more sophisticated purge cache features. As I have a small github hosted website, I can afford to do a brutal total cache purge, I may use the purge files by URL to make this more efficient.
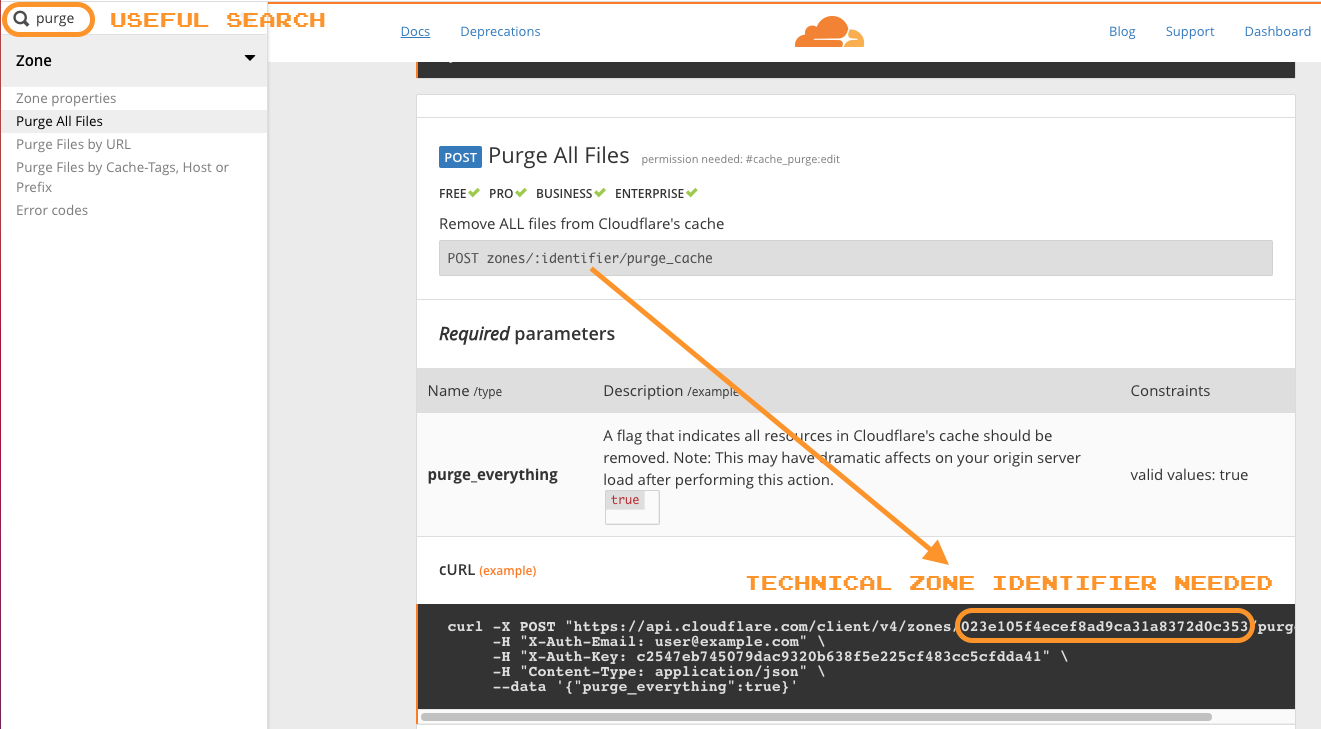
So purging cache requires to send a POST {{root}}/zones/{zone identifier}/purge_cache request, according to the curl example, that will be the technical identifier of my apihandyman.io zone.
I think I could get that identifier from the dashboard but I’m too lazy to do that.
Guessing how Cloudflare API works thanks to its design
Though I wouldn’t have design the Cloudflare API that way, it is still a little bit predictable.
I can get what I want (my apihandyman.io zone identifier) without reading the documentation.
First, based on the {{root}}/zones/{zone identifier}/purge_cache, I can guess that doing a GET {{root}}/zones will let me list all my zones, and the guess is correct!
I get a list of zone and the name property contains the domain name, so let’s try a GET {{root}}/zones?name=apihandyman.io to get only the zone I need, that works too!
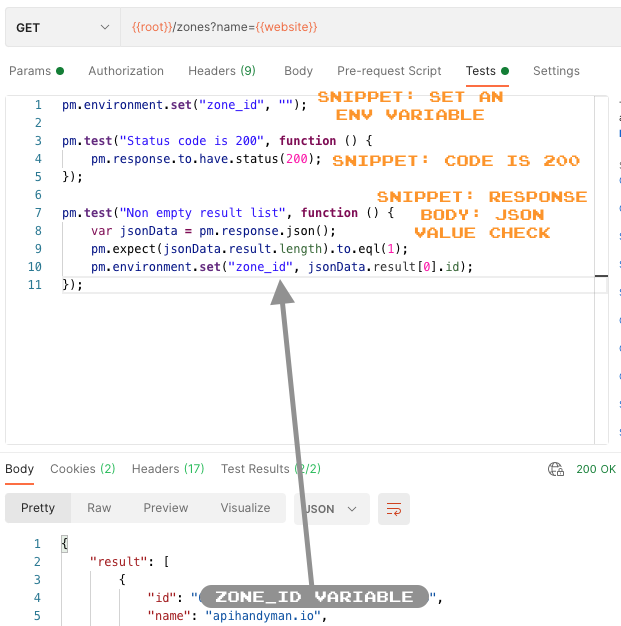
In order to make all this reusable, I set the website name as an environment variable. And in the Tests tab, I add some code based on Postman’s snippets to check that I get a successful response with a non empty list and then I store the zone identifier in a environment variable.
Now that I have my zone identifier, I can easily purge cache using the zone_id variable:
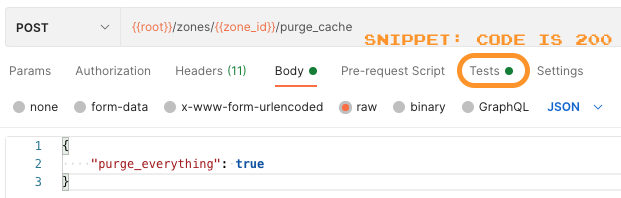
I just add a new {{root}}/zones/{{zone_id_}}/purge_cache request with a body containing the purge_everything set to true and I’m done.
Well, almost done, I also added a test to check that the request is successful using the snippet “code is 200”.
Purge cache collection
Now I have collection that contains 3 requests:
- Verify token
- Get zone identifier for website name
- Purge cache
Those requests relies on the following variables
| Variable | Type | Description |
|---|---|---|
| root | collection | The root URL of Cloudflare API (collection hard coded) |
| token | environment | The Cloudflare API bearer token (set by user) |
| website | environment | The website name to purge (set by user) |
| zone_id | environment | The zone identifier of the website (set by Get zone identifier request) |
Now we know how to purge Cloudflare cache, let’s see how to do it with a Github action.
Running a Postman collection within a Github action
In the beginning my idea was to simply do a curl command to call cloudflare API and possibly use jq if needed between calls but once I have seen that you can use Docker withing Github Actions and so run almost anything you want, I came to the idea of using Newman, Postman’s CLI, to run a Postman collection.
I exported my Cloudflare Clear Cache Postman collection as cloudflare-clearcache.postman_collection.json in the scripts folder of my apihandyman.io Github repository.
Passing variables to Newman
Running “Clearing Cloudflare cache” collection on the command line is as simple as running newman run scripts/cloudflare-clearcache.postman_collection.json:
Failed run
Cloudflare Clear Cache

→ Verify Token
  GET https://api.cloudflare.com/client/v4/user/tokens/verify [400 Bad Request, 1.08KB, 1034ms]
  1. Status code is 200
Oops, got a 400 instead of 200 when verifying token because there simply was no token provided.
Newman is unaware of Postman’s environment variables.
This is simply fixed as follow using --env-var name=value for each user defined variable of my Cloudflare Clear Cache Postman collection:
Setting environment variables
newman run \
    --env-var token=REDACTED_CLOUDFLARE_TOKEN \
    --env-var website=apihandyman.io \
    scripts/cloudflare-clearcache.postman_collection.json
Running Newman with Docker
Running Newman with Docker is almost as simple using the postman/newman image.
The thing you need to know is that when running a local collection file, the newman CLI inside Docker expects to find it in /etc/newman.
That’s why there’s a -v parameter in the following command, which mounts the folder containing the cloudflare-clearcache.postman_collection.json on /etc/newman:
Newman, Docker and Variables
docker run \
    -v /path/to/scripts:/etc/newman \
    -t postman/newman:alpine run \
    --env-var token=REDACTED_CLOUDFLARE_TOKEN \
    --env-var website=apihandyman.io \
    cloudflare-clearcache.postman_collection.json
Running Newman in Github Action Workflow
Now that we know how to run the cloudflare-clearcache.postman_collection.json with Newman and Docker, let’s add a job doing so to the Github workflow:
Newman in Github Actions
jobs:
  build_and_publish:
    [...]
  clear_cdn_cache:
    needs: [ build_and_publish ]
    env:
      POSTMAN_COLLECTION_BRANCH: main
      POSTMAN_COLLECTION_FOLDER: scripts
      CLOUDFLARE_WEBSITE: apihandyman.io
    runs-on: ubuntu-latest
    steps:
      - name: ⬇️ Download Cloudflare Clear Cache Postman collection
        uses: actions/checkout@v2
        with:
          ref: ${{env.POSTMAN_COLLECTION_BRANCH}}
          fetch-depth: 1
      - name: 💥 Clear Cloudflare cache
        run: |
          docker run \
          -v ${{ github.workspace }}/${{env.POSTMAN_COLLECTION_FOLDER}}:/etc/newman \
          -t postman/newman:alpine run \
          --env-var token=${{secrets.CLOUDFLARE_TOKEN}} \
          --env-var website=${{env.CLOUDFLARE_WEBSITE}} \
          cloudflare-clearcache.postman_collection.json
I added clear_cdn_cache job after the build_and_publish one:
- The
needsproperty says this job will only start AFTERbuild_and_publishsuccess (without that both jobs start in parallel) - In
envI declare a few variables and especially theCLOUDFLARE_WEBSITEneeded by the Postman collection - The first step downloads the collection, it’s in current repo, but it could be elsewhere
- The second step runs the collection with newman, note that I obviously didn’t put my Cloudflare token there, instead I’m using a secret
${{secrets.CLOUDFLARE_TOKEN}}. To configure a secret, go to the repository’s Settings tab, then Secrets.
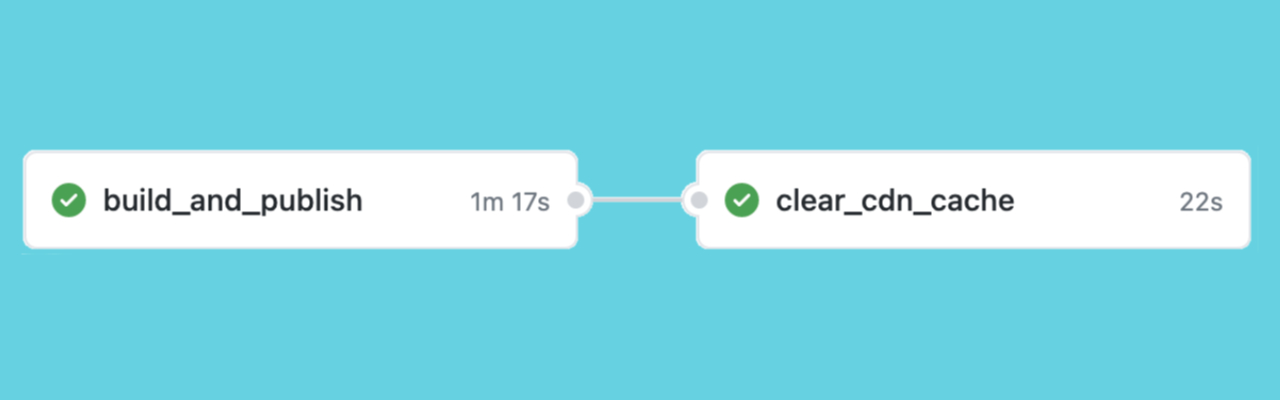
And 🎉:
Note that, on line 5, the token value (${{secrets.CLOUDFLARE_TOKEN}}) is (hopefully) not printed as it is as secret.
Automate all the things!
Being able to run Postman collection within Github actions opens endless possibilities but more important, all what I’ve done here can be done because people actually worked hard to bring the best possible user experience at every level:
- Regarding APIs DX, the Cloudflare API and its documentation can be taken as a good example (even though I would tweak a thing or 2 in their design), it’s a shame they don’t advertize their wonderful API on their homepage.
- Postman and Newman easily help me to avoid writing painful bash/curl scripting.
- Github actions being so well documented and simple are a pleasure to use, being able to use others’ actions and the Docker capability are killer features
- And so Docker participates greatly in this awesome user experience, making it easy to run absolutely everything wherever you want